Quantcast
Channel: Exchange Server Blog
Viewing all 133 articles
Browse latest View live

How to Import Multiple PST files in Exchange 2010

$
0
0
Importing a PST file directly in Exchange 2010 mailboxes is not an easy task , as a lot of additional settings need to be modified before the execution of PowerShell like permissions granting, creating a network share folder for importing multiple PST files, and bunch of cmdlets for completing the job successfully. 


 So in this article, I’m sharing the right process to import a single PST file to user’s primary mailbox and users achieve mailbox. And also the way to import multiple PST file in Exchange server 2010. Have a look-

Assign permission

The very first step which you need to do is permission granting because import export functionality (by default disabled) will not be enabled until the 'Mailbox Import Export'role is assigned to ExchangeAdmin user. In this article I am granting permission to ExchangeAdmin user so that he can use cmdlets to import a PST file, as the cmdlets are not available if the required permissions are not assigned. The error message prompts if permission is not granted-

“Exchange is unable to establish a connection to the target mailbox”

So logon as main administrator account and run the below command to enable the import export functionality by assigning permission to ExchangeAdmin user-

New-ManagementRoleAssignment –Role "Mailbox Import Export"–User ExchangeAdmin
Now permission has been granted to Exchange Admin, and he can open Exchange Management Shell to run PowerShell commands.

Importing PST file to User’s Primary Mailbox

The below example imports a PST file data into Peter’s primary mailbox

New-MailboxImportRequest –Mailbox Peter –FilePath \\Server01\PST-Files\peter.pst

You can also use Get-MailboxImportRequest and Get-MailboxImportRequestStatistics cmdlets to monitor the import request status.

Get-MailboxImportRequest | Get-MailboxImportRequestStatistics | ft MailboxName,Percent*,BytesTransferred*

Import PST file into a User’s archive

Similarly, if you want to export a PST file into a user’s archive folder, run the below PowerShell

New-MailboxImportRequest -Mailbox Peter -IsArchive -FilePath \\SERVER01\PSTFiles\Archives\Peter\Archive2015.pst

This cmdlet imports PST file into Peter's archive folder. The PST file content will be merged into existing folders, and folders will be created if they don't already exist in the target folder structure.

Using PowerShell to import multiple PST file 

You can also import PST files in bulk using shell command. Place all the PST files in a file shared folder, and now it is possible to execute New-MailboxImportRequest to import all the PST files into the matching mailboxes.

Dir \\SERVER01\PST-Files\*.pst | %{
    New-MailboxImportRequest –Name PstImport –BatchName ImportingMultiplePSTFiles
        –Mailbox $_.BaseName –FilePath $_.FullName
}

You can also see the complete PST import request by executing this shell command-

Get-MailboxImportRequest | where {$_.status -eq "Completed"}

And, you can also remove it after request is completed because mailbox import request remain on Exchange server until it is removed by administrator.

Get-MailboxImportRequest | where {$_.status -eq "Completed"} | Remove-MailboxImportRequest

That’s it!

So these are the possible solutions which you can follow to import PST file into Exchange mailboxes.

Fixed: Cannot open your default e-mail folders. You must connect to Microsoft Exchange with the current profile before you can synchronize your folders with your Outlook data file (.ost)

$
0
0

Cannot open default email folder error is one of the most occurring error that an Outlook user face, which usually occurs whenever you try to connect with Exchange server. And the worst part is that Outlook doesn’t work but you still can access your inbox using OWA account. It means all the settings are working appropriately; whether it is Active Directory account, Exchange account, and mail profile setup. So what’s wrong with it?


Probably, the issue is related with MS Outlook settings. It might be possible that your current Outlook profile is not a member in Exchange Server Active Directory. 

The long story in short, you need to notify the MAPI profile to prompt for your login credentials, so that your profile gets authorized by Exchange Server correctly.

To resolve this issue, you need to change MAPI setting in control panel.

Navigate through Start -> Control Panel -> Mail

Select the 'Show Profiles…' option in Menu Setup window.


Select the displayed MAPI profile and click to 'Properties'.


Click Email Accounts…


 Select your Exchange account and click Change… under Email tab.


Check the Exchange server name and User Name, and make sure that 'Use Cached Exchange Mode' is checked. Click on More Settings…


Now verify that 'Always prompt for logon credentials' option is checked as shown in the below shot.


Apply the settings and click OK. So the next time when you start your Outlook account with Exchange profile, it will ask you to provide your domain\Username credentials. Just enter the required details and Exchange server will authenticate your Outlook profile.

So this is the very first fix to resolve the issue which usually works in most of the cases However, there is lot of other solutions too that you may try to resolve 'you must connect to Microsoft exchange with the current profile before you can synchronize'error.

Another major cause of the error could be the OST file corruption. That’s why Exchange server couldn’t authenticate your profile. So if you have setup the email profile as described above but still the issue is not resolved; probably the problem is with OST file. You only need to repair the corrupt OST file using Stellar OST to PST Converter software, and save the data in PST format. Now you can import this PST in your Outlook profile, as it is the easiest way to resolve this Outlook error. 

Along with this solution, you may also give few other recommended methods a try-

·         Navigate through: Exchange Server -> Services. Check that 'Microsoft Exchange RPC Client Services' is started or not. In case if it is already started, restart it again.

·         Also verify that 'Microsoft Exchange Information Store' service is running in your server.

·         You may also give another weird solution a try! Open your profile using OWA and then start Outlook. In some cases the solution works like a charm!

So these are few other solutions to fix 'Cannot open your default e-mail folders'. But before using the above suggestions, make sure that OST file is not corrupted. Because the corruption in the OST file cannot be fixed any manual solution. All you need to repair Outlook OST file using Outlook OST repair software (http://www.stellarservertools.com/ost-pst-converter.php) and lets the Exchange server connect with your working Outlook profile.

So the next time if you face the error, you know what‘s the quick solution to fix the error. 

If the issue still persists, please let me know in the comment box.

Thanks,

Restoring Disabled/Deleted Mailbox in Exchange 2010 (Steps)

$
0
0


You might get stuck in a situation where you have accidentally deleted mailboxes in Exchange Server 2010, and now you need to restore them. The process to connect and restore mailboxes in Exchanges server is quite similar as other versions; all you need to use few cmdlets to get the job done.


But before moving ahead, we should know what is the difference between a deleted mailbox and disabled mailbox. In short, these are two types of a disconnected mailbox. And disconnected mailbox is a mailbox object in the Exchange store that is not connected with any Active Directory (AD) user account. All the disconnected mailboxes remain in Exchange server database until the mailbox retention period is over. During the period you can connect and recover any mailbox by connecting it to an Active Directory user account.

Let’s see the common difference between them-

Deleted Mailbox: Anytime when you move mailbox from one database to another database in Exchange server 2010, Exchange server doesn’t delete the mailbox on the original source but it switch the mailbox to soft-deleted state once the mailbox has been moved.  You can access the mailbox data anytime during the rendition period but once the retention period expires, it cannot be accessed anymore.

 Disabled Mailbox: Every time when you disable or remove a mailbox using Disable-Mailbox or Remove-Mailbox commands, Exchange server doesn’t delete the mailbox permanently but it switch the mailbox to a disabled state. During the retention period the disabled mailbox can be recovered without restoring the whole mailbox database.

So in the article you will go through the multiple methods to restore the disconnected mailbox in Exchange server, either you can use Exchange recovery third party software or Exchange server 2010 cmdlets to restore the mailbox manually. Let’s check it-

Solution 1:

Recovering Deleted and Disabled Mailbox using Exchange Recovery Software
I suggest you try out Stellar Phoenix Mailbox Exchange Recovery software to restore deleted and disabled mailboxes. You can download Exchange mailbox recovery software by visiting the official download page: http://www.stellarservertools.com/recover-exchange-mailbox.php

The primary reason why you should prefer this solution over cmdlets because the below cmdlet doesn’t work if mailbox is corrupt. You can only use the below procedure if the deleted mailbox in not corrupt. However, if the deleted mailbox is corrupt, not cleanly shut down, or didn’t get restored using the cmdlet; you can always use this software to repair and restore them on live server. This utility not only allow you to restore or recover accidentally deleted/ disabled mailbox, but also allows repairing corrupt mailboxes and then restore them to targeted user’s mailbox on Exchange server.

Using the Shell Commands to Restore a Deleted Mailbox

Soft-deleted mailbox cannot be restored using Exchange Management Console (EMC) in Exchange Server 2010. Check here what Mailbox Permissions are required to restore mailbox using PowerShell.

First, run the below cmdlet to display the list of all the deleted and disabled (disconnected) mailbox.
Get-MailboxDatabase | Get-MailboxStatistics | where {$_.DisconnectReason -ne $null} | ft displayname,database,disconnectreason -auto

Now run the command to use New-MailboxRestoreRequest to create the restore request. For example, you’ve found the Thomson mailbox as soft-deleted mailbox by executed the above command, and you have to restore this mailbox on mailbox server MyDatabase to Thomson’s mailbox.

New-MailboxRestoreRequest -SourceDatabase "Mydatabase" -SourceStoreMailbox "Thomson" -TargetMailbox Thomson

And if you want to restore mailbox to Thomson’s achieve mailbox, run this command-

New-MailboxRestoreRequest -SourceDatabase "Mydatabase" -SourceStoreMailbox "Thomson" -TargetMailbox Thomson-TargetIsArchive

That’s it! So it is procedure to restore a soft deleted mailbox in Exchange 2010 server. Now check the steps to restore disabled mailbox.

How to Connect and Restore Disabled Mailbox to a User Account in Exchange 2010

For e.g., you have found a disabled mailbox Alen and you have to reconnect Alen’s mailbox to his existing Active Directory account. Run this command-

Connect-Mailbox -Identity "Alen" -Database MyDatabase -User Alen

You can monitor the current process status by running this command-

Get-MailboxRestoreRequest

Rest of the procedure is same as we have done above while restoring deleted mailbox.

So this is the step-by-step procedure to restore disconnected mailbox in Exchange Server 2010. And in case if you face any difficulty with cmdlets, you can always follow the first solution and use Stellar Phoenix Mailbox Exchange Recovery software to get the job completed without any hassle.

How to Migrate Recovered Exchange Mailboxes to Office 365

$
0
0


We know that a deleted Exchange user’s mailbox can be easily recovered and restored, and migrated to Office 365 using multiple methods. Along with manual procedures to migrate recovered mailboxes to Office 365, we also have few trusted software which recover and export deleted Exchange server mailboxes to Exchange Online. 

 So today I’ll discuss the smart way to move mailboxes from on-premises Exchange server to Office 365, in case if the mailboxes have been deleted from the database but still in the retention period.
Compared to my previous Exchange recovery & mailbox migration blog posts, today I’m shedding light on the advanced way to migrate Exchange server mailboxes to Office 365 using a prominent Exchange recovery software. 
 Yes, I’m talking about Stellar Phoenix Mailbox Exchange Recovery– An unmatched utility that not only allows us to repair, recover, and restore corrupt or deleted mailboxes from the offline Exchange database, but also avails the functionality to export the recovered items to Office 365 mailboxes!
Let’s check it-
Note: If you have to restore the deleted mailboxes from Exchange server then make sure that deleted mailboxes are still in retention period.
 Recovering & Restoring Deleted Exchange Server Mailboxes
First, visit the official download page and install the software: http://www.stellarservertools.com/recover-exchange-mailbox.php

1. Run the software and open your offline Exchange database file (EDB). Once you find the EDB file, select it and click Start. However, if you couldn’t find the exact location of EDB, this software helps you to locate all the EDB files stored anywhere in your system. Click Find EDB in this scenario.

How to Migrate Exchange Mailboxes to Office 365


2. In the next window you can select the specific location where your EDB file might be saved and click Start. Rest the software will search and display all the saved EDB file in Find Results section. Select the required EDB from the listed files and click OK
Mailboxes Migration to Office 365


3. In the next step you will find two steps to scan the EDB file. However, Quick Scan is the quicker method to scan the EDB file, but if you want better result from the EDB file; I suggest you select the Extensive Scan option. This process might be time taking but it reverts the better output, specially you have to recover the deleted mailboxes from the Exchange database.
 Migrate Exchange Mailboxes to Office 365


4. If you’re not sure in which EDB file the deleted mailbox was previously stored, you can also add multiple EDB files in the process. The process is as simple as you did it in step 2. Locate the EDB file and add in the scanning process.
 Note: The time of the EDB file scanning depends on the size of EDB file and how many EDB files you’ve added to restore the deleted mailbox.

Exchange Mailbox Migration


5. Once the job is completed, all the EDB files and saved mailboxes will be shown in left pane. You can check every folder of each mailbox by simply click on it. Just go through the mailbox folders tree and locate the mailbox which you want to restore. The deleted mailbox will be only appeared if the mailbox retention period is not over. Otherwise it will be permanently lost and cannot be recovered. 
 Recovering & Restoring Deleted Exchange Server Mailboxes


6. The procedure to migrate mailboxes to Office 365 is even easier you had ever performed. Once you’ve find the deleted mailbox, just select it and click Save from File menu. Select Office 365 from saving options.
 migrate mailboxes to Office 365


7. Remaining job will be done by the software itself. You only need to provide the credentials of your Office 365 account so that software can authenticate the details with your Office 365 profile.
Office 365 Migration


That’s it!
So these are easiest steps to recover deleted mailboxes from Exchange server and migration of the recovered mailboxes to Office 365. If you’ve accidentally deleted any mailbox from the database but mailbox retention period is not expired according to your Exchange server settings, the deleted mailboxes and their items can be restored from the EDB file. Later, you can export them to Office 365 as per your convenient. 
 Apart from the Office 365 migration, there are few other benefits of having this software. If you need to migrate the mailboxes to another live server, you can also do this in few clicks. 
 Thanks,

How to Backup Exchange Server Mailboxes for Free!

$
0
0
We all know what is the traditional approach to backup Exchange server for free – of course, the Windows Server Free Backup! I’m not denying it is the most popular way to backup Exchange server but it is also true there are some limitations as well which enforce Exchange administrators to look beyond the basic backup method. 


As a free Exchange server backup solution, Windows Server Backup avails you lot of features which cannot be expected in free Exchange backup tool, but there’re few shortcomings as well in the traditional backup method such as - you cannot backup Exchange server remotely, single mailbox backup is not possible, mandate to take full VSS backups for logs to be truncate, etc.

So these are some of the key reasons why do organizations go for third party Exchange backup software, because paid solutions allow them new features and the fix to the limitations of free Windows Server backup. 

If you’re looking for an alternative to Windows Server Backup which wouldn’t cost you more and lets you lot of advanced features, I suggest you try Stellar Phoenix Exchange Server Backup software

This Exchange backup tool is completely free for few months so you can try it out yourself and see how beneficial it could be as a free solution.

So today in this article I’m covering the complete process how to perform free Exchange mailbox backup using this utility. Just download the software and install it. It is ready to use and fully activated, as no activation key is required. Download the full version by visiting the Steller’s official website: http://www.stellarservertools.com/exchange-server-backup.php

Free Exchange Server Backup using Stellar Exchange Backup Tool

The home screen of software allows you to perform multiple jobs but click the first one MS Exchange Backup. To perform full Exchange server backup, select first option.


On the next screen software will display all the existing database available for the backup task. You can select any storage group which you want to keep as backup, and click Next.


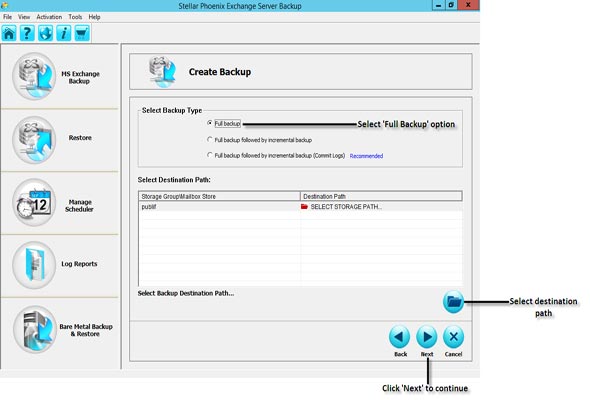
Depends on your requirement you can choose any option from multiple Exchange backup types. If you’re creating backup very first time, I suggest you select the first option the Full backup and click Next.


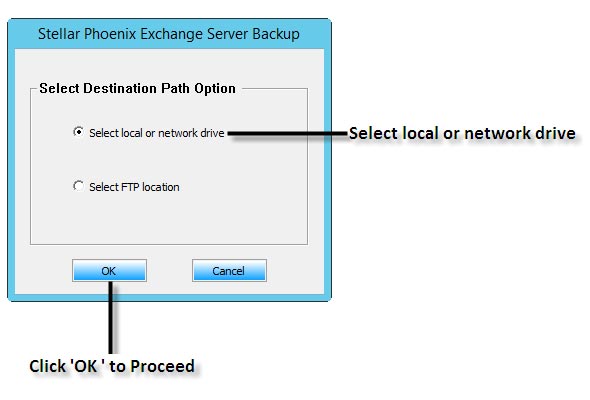
Now select the destination where you want to store this backup. Click Select local or network drive if you want to save it somewhere in local drive.


Select the folder to backup selected storage group.


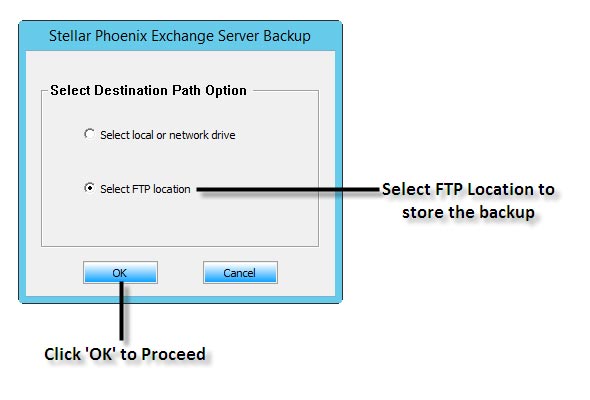
In case if you want to store the backup at any remote location, click Select FTP location.


Enter the correct FTP logon details and click OK.


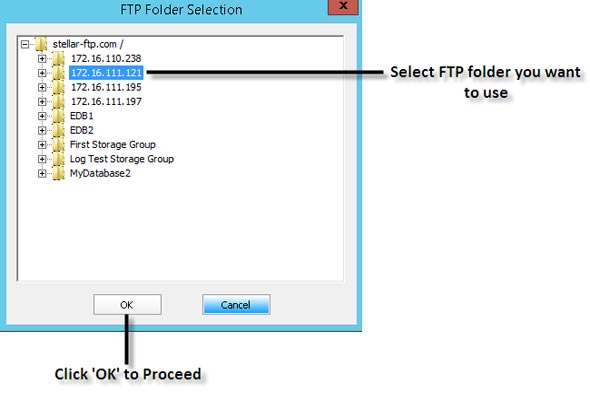
Select the FTP folder which you want to use and click OK.


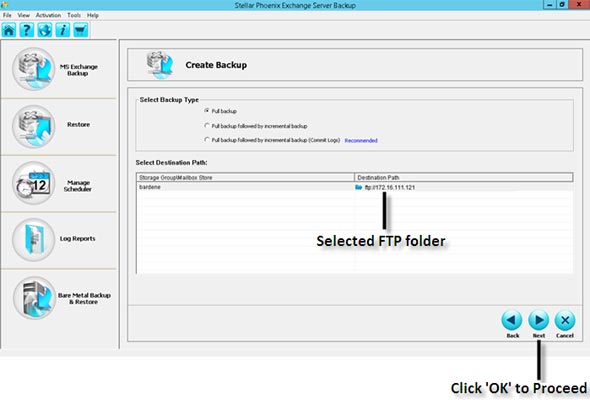
The next screen will display the selected FTP folder in the Destination Path column. Select the FTP folder and click Next.


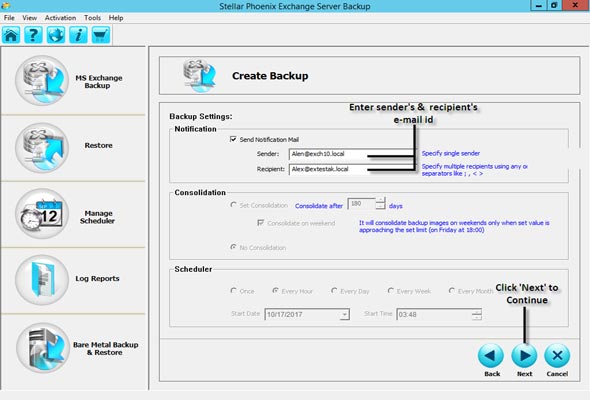
Next screen is the Backup Settings page. You can configure here the Notification details, backup scheduling, and Consolidation option. Click Next once you’re done.


Now Click Finish and sit back. The complete backup summary will be shown on the Backup Summary view.


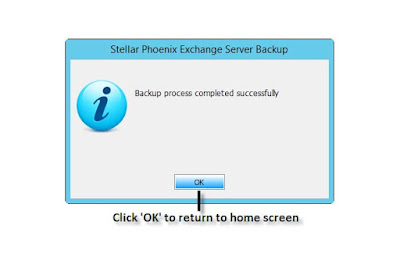
One the backup job is completed, a dialogue box of job successful will be appeared on your screen. 


That’s it!

So these are the quick steps to perform Exchange server full backup for free. In case if you want to perform the Incremental backup, check here the software user guide, as it is even easier to perform than full Exchange backup. Have a look into the Help Guide:http://www.stellarservertools.com/pdf/exchange-server-backup/User_Guide.pdf

However, we can also restore the backup to the Exchange server using the same software Stellar Phoenix Exchange Server Backup but ’ll discuss this topic in my next article. Until then, don’t forget to test this free Exchange server mailbox backup tool over here: http://www.stellarservertools.com/exchange-server-backup.php

Stay tuned for the next post!!

Fixed: Exchange Error c1041724 when you try to mount a Database

$
0
0
While mounting an Exchange database restored from the last Exchange backup, sometimes the mounting process fails, and Exchange server prompt the following error messages-


“An internal processing error has occurred. Try restarting the Exchange System Manager or the Microsoft Exchange Information Store service, or both.”

"C1041724 error occurs when you try to mount a database."

So if you’ve recently encountered one of these errors and looking for the solution, the article describes the possible causes and similar solutions to fix unable to mount Exchange database error

Let’s investigate the root causes when the last time you failed to mount an Exchange database-

1. The very first thing needs to be checked that you’ve restored the database from the Exchange backup accurately Or, if you had forgotten to check The Last Backup Set (Log file replay will start after this restore completes)’ option during the restore process. 

2. Another possible cause is the insufficient disk space. This error can occur if there is not enough free disk space on the drive which contains the restored databases that you’re mounting to Exchange server.

3. Check that if the database was shut in the clean state and correctly restored from the backup.

4. Probably your Exchange database is corrupt, orif you’veexecuted Eseutil/p to repair the database but the log files remain intact and not removed. In such case, database fails to be mounted and through the error.

5. And lastly, verify that you haven’t restored more than one storage at a time.

So these are the most common causes why did you fail to mount the database to the server. Fortunately, there are a lot of solutions that fix the database from the error. By following the few steps database can be again mounted to the server with no further errors. Let’s check the best possible solutions-

The first solution, free some additional disk space if the error occurred due to insufficient disk space. All you need to just perform offline database defragment to release the database white space. Database defragmentation is quite easy with the Eseutil utility (Eseutil.exe). And if there is a lot of transaction log files on the same drive too, you can also avail some free space by removing them. Check the Microsoft KB to remove unnecessary transaction log files.

Secondly, while restoring the database make sure Last Restore Set is checked and restore only one storage group at a time.

Lastly but not least, it is recommended to run hard recovery before mounting the Exchange database. There are two standard ways to run hard recovery – either use manual hard recovery using Eseutil command or using an advanced tool for Exchange Server database recovery.

If you’re using manual hard recovery, run the command and mount the database using the Exchange System Manager-

eseutil /cc [path to directory containing Restore.env]

However, it requires strong PowerShell skills if you’re performing it manually. And in case if it fails to run hard recovery, the data from the affected database will be lost in the absence of backup.

So it is recommended to prevent the database from further damages and perform recovery efficiently and mount it again without any failure. Download Stellar Phoenix Mailbox Exchange Recovery software by visiting official web page http://www.stellarservertools.com/recover-exchange-mailbox.php, and recover the affected database from severely corruption and export it again to a live Exchange Server.

The software lets you perform the database recovery and exporting the mailboxes back to the server in few click without interrupting Exchange server’s other services or any data loss. All you need just to download and install the software, rest sit back, the software will do the remaining job by itself for you! 

Thanks,

Fixed: Outlook is using an old copy of your Outlook data file (.ost)

$
0
0


Today I’ve found the solution to Outlook’s most common error which anonymously shows a prompt on the screen when you restart your computer and open Outlook account or restart MS Outlook. 


 If Outlook displays the error message such as"Outlook is using an old copy of your Outlook data file (.ost). Exit Outlook, delete the file, and restart Outlook. A new file will be automatically created the next time you initiate a send/receive," when you open or restart Outlook email client, probably the OST couldn’t be properly accessed by Outlook. 


The error indicates that Outlook can’t access the OST file because Outlook or Windows has crashed. However, it is a cached file: the original one of your mailbox is still safe on your Exchange server; so it is safe to delete the OST file. Also, the next time your Outlook profile will connect to Exchange server, a new OST file will be created at the same location. The process to search and delete the OST file is very simple.

If you’re using Windows 7:

1.       Open Computer from the Start menu.

2.       Navigate through File> Organize> Folder and Search Options, and click the View tab.

3.       Click 'Show hidden files, folders and drives' and uncheck the 'Hide extensions for known file types' option. Click OK

If you’re using Windows 10:

1.       Open File Explore and click View menu. Check File name extension option and the Hidden items.


1.       Navigate to the below location (in the Computer (Win 7) or File Explore (Win 10)) -

    C:\Users\<username>\AppData\Local\Microsoft\Outlook


Now look for the associated .ost extension file and delete it (Make sure Outlook is closed). Next, open Outlook once again, and try to connect to the server. Outlook will take some extra time to recreate the cache copy because you have recently deleted the cached OST file. However, you can notice the 'updatingfolder' notification in the lower side of the window. Once all the cache folders are updated, your Outlook will connect to the server without any error.

However, if the issue persists and couldn’t be resolved by deleting the OST file, you can follow the below method -

1.       Open Control Panel and navigate to Mail -> Show Profiles, and select your Outlook profile.
2.       Once the file is selected, navigate to Properties -> E-mails Accounts

3.       Now change the existed email accounts or select View and click Next. Select Microsoft Exchange Server account and click Change.

4.       A new dialog box will prompt on your screen which displays the mailbox server and your username, click More Settings option.

5.       Click Security tab in the newly opened window and click to select the Encrypt data between Microsoft Exchange Server and Microsoft Office Outlook check box, and click OK.

Now, you will no longer receive the error message once the process is completed.

However, in some critical scenario, if the both solution didn’t work for you, it’s time to disable the DFS and disable cache Exchange mode.

Hopefully, the next time you reboot MS Outlook, no such error message will appear on your screen.

How to Migrate Exchange Public Folders to Office 365/Exchange Online

$
0
0


Exchange Online or Office 365 is not much different from the on-premises Exchange Server. Even Transportation rules, PowerShell commands, web administration, are also available in Office 365 to perform administrative tasks. Moreover, mailbox migration is much similar to Exchange server. However, migration of the public folder to Office 365 is much complicated as the process involves PowerShell scripts, which makes it difficult for a lot of Exchange administrators.  


So in this Blog post, I'm sharing the preferred way to migrate public folder to Exchange Online using PST file because it is the easiest way to do so. Moreover, I'll also suggest you a utility to migrate Exchange Server public folders without any hassle. 

Let’s begin with the manual method i.e., migration with the help of PowerShell. However, the below described procedure only gives you a brief overview of how to start and complete the Public Folder migration successfully. Let’s look at how:

Public Folder Migration with PowerShell

1.       Firstly, ensure that all the folders stored on the local Exchange Server are not bigger than 19 GB. In case you find any folder larger than the limit, reduce its size.

2.       Exchange Online only allows migration of 50 folders at a time; therefore, ensure that the public folder does not contain more than 50 folders. 

3.       Migrate user's mailboxes first then followed by Public Folders. Next, enable Outlook Anywhere on on-premises Exchange Server.

4.       You can execute the Shell command to save an image of the current folder structure that will help you to verify once the migration process is completed.

5.       Create an excel file tomap folder name-to-size and folder-to-mailbox entries.

6.       Access Exchange Online account and create Public Folder mailboxes. If you’re good with PowerShell, you can also do this in a remote session mode using shell scripts.

7.       Now here you need to execute a bunch of PowerShell commands to migrate Public Folders. 

8.       After executing 11 different PowerShell scripts, lock down the Public Folder to sync with Office 365/Exchange online. The Public Folder will no longer be accessible until the synchronization is completed. 

9.       Next test whethermigrated folders are accurate or not.Check thepermissions, the ability to create items in folders as well as the ability to creation and deletion of folders.

1.   You can unlock Public Folders for other mailboxes.

1.   Verify the above process (step 9) again.Compare with the snapshot(created in step 4) with the snap of Exchange Online after migrating Public Folders.

1.   Finally, you can remove Public Folders from the source Exchange Server.

As is shown that the above process is considerably complicated because of heavy PowerShell scripts, therefore, going for an automated solution to migrate Public Folders to Office 365 would be a better alternative.

An Automated Way to Migrate PF to Office 365

Public Folders Migration utility is the recommended way to migrate folders on Exchange Online. Here, leveraging Stellar EDB to PST Converter software to migrate mailboxes and Public Folders from Exchange Server to Office 365 would be the best bet. The software allows you to move Public Folders from EDB to Office 365 mailboxes with no hassle and reduces the complicated PowerShell scripting steps to zero. 

If you want to understand the functionalities of the software, download the trial version of Stellar EDB to PST Converter, and migration would take place with just a few clicks!

However, PST migration is another way to do the same, but it will again require the Exchange Admin Centre (EAC) to initiate the process. In case if you want to try this method, follow the below steps:

1.       Create public folder mailboxes and Public Folders in EAC. 

2.       Before performing the task, take the backup of Public Folders using Outlook Import/Export feature.

3.       If you haven’t configured Office 365 account yet, configure it on Outlook in the Exchange mode. Now add newly created Public Folder in it.

4.       Use Outlook Import feature to store backup to new created Public Folder. The stored data will be automatically synced with Office 365 Public Folders. The time to finish the job depends on the size of folders and the speed of internet connection.

5.       Once the migration process is completed, you can again assign the permissions to the corresponding users. 

So these are the few methods to migrate Public Folders data to Office 365, some process required expertise at PowerShell Scripts, and some are time-consuming because migration using PST files take a longer time. But with Stellar EDB to PST Converter software, migrating mailboxes and Public Folders from Exchange Server to Office 365, is carried out effortlessly. To know more, please visit: http://www.stellarservertools.com/exchange-edb-pst-converter.php

Restoring Exchange Server Database from a Storage Failure (Database is not Mounting)

$
0
0


We all know ‘unable to mount Exchange database’ is the most frequent and common issue faced by Exchange administrators, and database restoration is the last option to get rid of it. However, below are the possible options to get the problem resolved when database storage fails:

    A good and updated Exchange backup is available.

    Exchange database is down.

     Mounting a new or blank or empty database with the messaging kept active until the database is repaired.

    Performing a soft-recovery and fixing the database.

    Opting for a professional Microsoft Exchange Server recovery software.

Let’s now discuss each option to restore the Exchange server database in a step-by- step process:

1. A Good and Updated Exchange Backup is Available 

If you find yourself in the midst of such a situation, the first thing you need to check is whether there is an updated backup on the server. Go for the best Exchange Server backup software to restore the Exchange database from the backup with minimal downtime, but ensure that the live data is retained on the existing storage drive. Once you’ve restored the database from the backup, create a recovery database and repair the failed database and combine it with your process.

But before restoring the database using Exchange backup software, create a copy of the database or just rename it. Using the database without even copying or renaming can override the database file on existing storage drives.

2. What if No Backup is Available and Exchange Database is Down 

If a backup is not available, you then need to verify the health of the database. Because you don’t have any backup copy of the database, and the size is very large (approximately 8-10 GB), it will take several hours to run a successful repair. So firstly, make a copy of the database (if the backup is available) so that if the repair job is interrupted in the middle of the process, you can restart the job with the saved backup copy.

Let’s now examine the health of database:

Open PowerShell and locate the default location of Eseutil.exe. If you couldn’t find the utility, open the following folder location by navigating to the path:

C:\Program Files\Microsoft\Exchange Server\V15\Bin

Next, run the below command to check the health of database:

.\eseutil.exe /mh "D:\log files\Mailbox Database\DB1.edb"

(I) If database is healthy and showing a Clean Shutdown state:

The database still can’t be mounted back to the server because it isn’t able to read and understand current log files sequence. So you need to delete all those log files and then mount the database. Exchange server will generate new log files for the database and mount the database successfully.


3. Mounting a new or blank or empty database with the messaging kept active until the database is repaired.

Follow the steps below:

         i.            Stop Microsoft Search Service and Search Host Controller Service:

 
       ii.            Now rename the database folder and create the same folder. The server will force you to create an empty database while mounting the store. Soon, when you mount the blank database, Outlook will prompt you to restart the program. 

     iii.            If Outlook is in cached mode, it prompts you with two options; select ‘Use Temporary Mailbox’ to send and receive emails using temporary mailbox or ‘Use Old Data’ if you have a PST file.

Take another case where the database is showing a dirty shutdown state. First, check whether the required log files are available or not. If log files are available, do search for .chk file in the same location. However, in case the log files can’t be located, then try Soft Recovery

4. Performs Soft Recovery (eseutil.exe /r) and Repair the Database

As the log files are missing, you’ll need to get the database in good health.

.\eseutil.exe /r e01 /l "D:\log files\DB1" /d "D:\Program Files\Microsoft\Exchange Server\V15\Mailbox\Mailbox Database\DB1.edb" /a

/D switch stand for database location
/l is used for log file location
/a– database will come in good shape but the possibility of data loss is also there.

By executing the above command, the database will show you a clean shutdown state. Now you can mount the database to the server. But in case it fails, move the log files and try to mount it as the databases are in clean shutdown state. In case Soft Recovery is not of any help, you may then need to opt for Exchange database repair or recovery software.

5. Go for Exchange Server recovery software

Though there are several solutions to fix the issue, yet none promises zero data loss during the database repair process; especially, when you have to repair and mount a large database. Then the chances of database failure as well as data loss increases. 

In such a case, you should always go for an Exchange database repair software that can help you not only repair the database, but also recover and export the database to the live server. 

Stellar Phoenix Mailbox Exchange Recovery software is a conglomerate of all the above features. Whether the database is corrupted, offline, down, or of large size, Stellar Exchange database recovery software lets you repair the database with guaranteed zero data loss and the choice to export the recovered mailboxes to a working live server. Once the process is completed, you can check the generated log report to carefully analyze the database recovery process. 

To view the features and functionalities of the software, you can download the trial version by clicking the url: http://www.stellarservertools.com/recover-exchange-mailbox.php
Thanks,

How to Extract Mailbox Messages from Exchange Server Backup

$
0
0


I've seen a lot of cases where Exchange administrators complain they have done everything appropriately, but now they cannot extract mailbox messages from Exchange backup! Every time they try to restore the mailboxes from Exchange database backup, the mailbox restore fails with the random error. 

So what is the reason if mailboxes couldn’t be extract from a pre-restored Exchange backup file? Of course, the Exchange backup file is corrupt. Due to random damages in backup file stop it making relation with server and mailbox extraction job doesn’t get succeeded.
 
So here in the blog post I shading light on another most common but frequently occurred issue – ‘Cannot extract mailbox messages from the Exchange backup’. Unlike my earlier blog posts where I usually suggest manual procedures, here, I am recommending an easy-to-use and advanced utility, Stellar Mailbox Extractor for Exchange Backup, which seamlessly extracts your mailbox, and that too, within a short duration.

The powerful software is developed by Stellar to make Exchange administrator’s job easier. Below are the key features if you want to test the software-

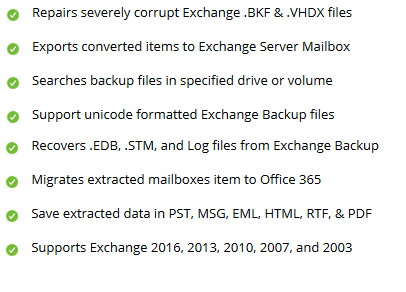
·         If your Exchange backup file (.BKF & .VHDX) file was corrupted, you can repair these files.

·         If you have restored EDB, LOG, or even STM file in Exchange Server backup, it can also be recovered using the software.

·         The tool helps you extract mailboxes from Exchange backup

·         Migrates the extracted Exchange mailboxes directly to Office 365

·         In case you couldn’t find where is the backup file is located on the drive, you can search the backup file in particular volume or drive

·         What if your Exchange backup file is Unicode, don't worry – software supports Unicode format too.

·         What if you need to extract mailboxes messages from backup in other file formats rather than PST, this utility lets you save them in MSG, EML, HTML, RTF, & PDF.

·         Lastly but not least, it is compatible with Exchange 2016 & all other previous versions.

 How the use the software to extract mailbox or mailbox messages from Exchange backup file


First, use an appropriate option to open or find Exchange backup file. 


If you couldn’t find the saved backup file, use Find Exchange Backup option to search the file.


Once you find the backup file where the mailboxes are stored, start the file scanning process to check all the mailboxes and their items.


As you can see here all the mailboxes have been shown in the preview screen; you can check and extract every item in multiple saving formats.


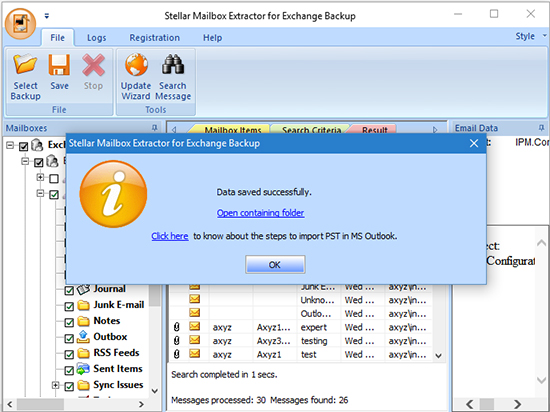
Now select the mailbox which you want to extract from the backup file and click Save from the File menu. Select the appropriate saving option and save the file. Here, I have picked PST because I wanted to import extracted mailbox messages to my Outlook file.


As you can see here, PST file has been saved at the desired location. Now it is ready to import into my Outlook profile.


Mailbox messages based on certain criteria can be also filtered searched, filtered, and saved. Just select the Search Messages option from File menu.


Do a search to find the required messages. Once search process is done, the Preview window shows you all the filtered messages based on filtered criteria.


Click Save option to extract searched messages.


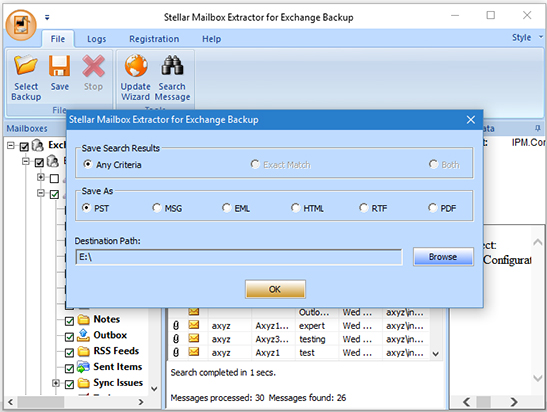
Now you have various options to save the messages extracted from the mailboxes.


Select the option which you want and save. I again picked here PST  :)


And I’m done! All the required messages have been saved from the mailbox extracted from Exchange backup file.

So these the quick steps you need to perform while extracting mailbox and messages from Exchange backup file using this tool. In case if you ever face the similar issue, you can download Stellar Mailbox Extractor for Exchange Backup from their official download page http://www.stellarservertools.com/repair-exchange-bkf.php, and say goodbye to all the issue which stops you extracting mailbox messages or mailboxes from Exchange backup file.
Thanks,


Exchange Server Toolkit - A Perfect Toolbox for Exchange Administrators!

$
0
0


Today I am going to introduce you an Exchange Toolkit box which perfectly fills the need of every Exchange Server administrator. Whether there is a need for Exchange mailbox recovery, mailbox extraction to another server/PST/or Office 365, Exchange Server password recovery, OST file conversion, or the recovery of mailbox or database from an Exchange backup file; Stellar brings one toolbox for all your needs!


Unlike traditional Exchange Server Toolbox, Stellar Exchange Toolkit isn’t about spam filtering or virus scanning – but it is more than that and makes administrator’s job easier.


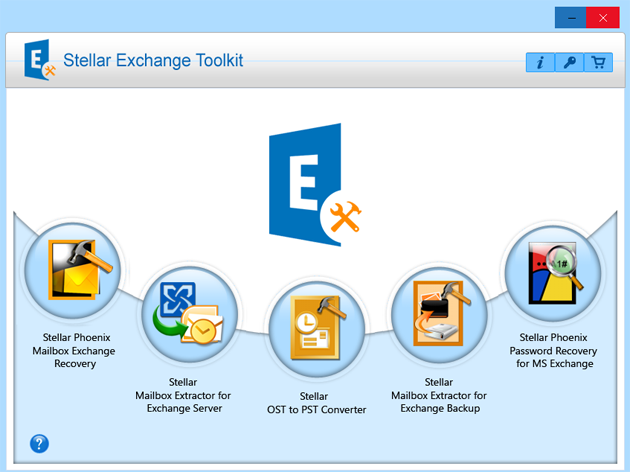
So let’s take this topic to another phrase and explore what will you get if you register for Stellar Exchange Toolkit software. The software contains five best software to deal with Exchange Server routine problems. Let’s see the bigger picture-

1. Stellar Phoenix Mailbox Exchange Recovery – The Software for Exchange Server Recovery!

2. Stellar Mailbox Extractor for Exchange Backup - For Extracting mailbox from Exchange Backup

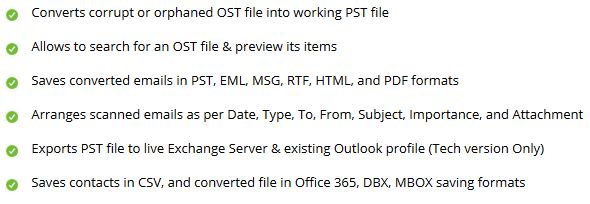
3. Stellar OST to PST Converter – For Extracting data into PST from OST file

4. Stellar Mailbox Extractor for Exchange Server – For Exporting Mailbox to PST 

5.Stellar Phoenix Password Recovery for MS Exchange (Resets Server Password)

1. Stellar Phoenix Mailbox Exchange Recovery


2. Stellar Mailbox Extractor for Exchange Backup


3. Stellar OST to PST Converter


4. Stellar Mailbox Extractor for Exchange Server


5. Stellar Phoenix Password Recovery for MS Exchange


 What Makes Stellar Exchange Toolkit A Must Have Utility


 What Experts Say about Stellar Exchange Toolkit


Official Address to Download Exchange Toolkit

Download Address:http://www.stellarservertools.com/exchange-toolkit.php


Register Address:    http://www.stellarservertools.com/buy-exchange-toolkit.php


Recovering Corrupt Database Exchange 2016 Causing Error 0x8004010F

$
0
0
Exchange Server 2016 is the latest Exchange server from Microsoft, which provides a rich, reliable, and more flexible platform with relatively IT costs. As with previous versions of Exchange server and in Exchange 2016 too, all the data of the user mailboxes is stored in an Exchange database file. The database file may get corrupt, at times, because of which you may see some strange behavior in the Exchange, and can put all the related data into danger. Thus, it is imperative that you should recover database (EDB) file using appropriate methods.


So if you find yourself unable in doing this, then there is an urgent need to use an Exchange database recovery utility to recover corrupt file.

Let us assume that you are working on an MS Exchange Server 2016 environment in which you are using MS Outlook 2010. You have encountered the following error message in the 'Sync Issues' folder:

“0x8004010F An object could not be found”

After getting this error, when you try to send an email in Outlook you are unable to do so. An error message is displayed, which is:

“Task 'Microsoft Exchange Server' reported error (0x8004010F): 'The operation failed. An object could not be found.'”

Possible Cause:

For this problem, the following reasons could be responsible:
  • While viewing 'Properties' in the Address lists settings in Exchange System Manager, the offline address book list object is either having an incorrect or missing address list.
  • When you view 'Properties' in the Offline address list settings, you find that the offline address book is either has a missing or incorrect address list.
  • The EDB file of the Exchange database is corrupt.
Solution:

To resolve the problem, you should perform either of the following methods.

  • To rectify Properties in the Address lists:
    Expand 'Server Configuration' in Exchange Management Console.
    Click Mailbox.
    Right-click 'Properties' in the 'Database Management' window.
    In the Client Settings tab, click 'Browse' and then the correct offline address book.
    Click OK two times.
  • To rectify Properties in the Offline Address list:
    Click Properties in Exchange System Manager.
    Verify the offline address list populates with a valid offline address list object.

If the problem is not rectified using these mentioned methods, then it means that the Exchange database file is corrupt. In such cases, you should recover corrupt EDB file using an exchange mailbox database recovery tool.

Stellar Phoenix Mailbox Exchange Recovery software http://www.stellarservertools.com/recover-exchange-mailbox.php is one of very few software which recovers database from severely corruption and saves recovered mailboxes in multiple saving format, depending on the choice of your need.

Restoring Exchange 2016 Mailbox Database with Windows Server Backup

$
0
0


The process to restore mailbox database in Exchange Server 2016 using Windows Server Backup is almost same as of other previous versions. This is what I love about Microsoft with every new launch! They do not much change the process how the system works for a particular environment, but they slightly make some improvements that helpful for users.

So here in the blog, I am taking advantage of traditional Windows Server Backup technique to restore the database in Exchange Server 2016 environment. Let’s check the complete picture-
Assuming you’ve recently performed a successful Exchange server backup but unfortunately, the database has been corrupted on the current server, or you need to restore particular backup for some special purpose. 

In such case, you can restore backed up database again to the server by performing following simple steps.

Launch Windows Server Backup Wizard

While you start Windows Server Backup, open Action panel from the menu and select Recover option. A new window named Recovery Wizard will have appeared, now follow the steps to choose the system volume where recently backup is stored.

Choose Backup Date

The new wizard will show you all the previously backup stored on the drive with the date and time information, whether it is oldest or newest. You can quickly identify which backup can be mounted or not by checking the status of the backup. Now select the backup which you want to restore in Exchange 2016. Make sure that you’re restoring recently backed up file.

Select Recovery Type

There are five options available for selecting recovery types such as Files and Folders, Hyper-V, Volumes, Applications, and System State in the next steps of recovery wizard. As you need to restore Exchange database (backup), so you need to select Applications recovery type.

Applications Recovery Type

While you’ve selected Applications type, here you need to select the Exchange Server. Select Exchange Server from the Select application to recover. Now ensure that the checkbox at the bottom (Do not perform a roll-forward recovery of the application databases) is not selected. If it is already selected, uncheck it. 

It is recommended to uncheck the box because if you leave it checked, all the email communications performed on the server between the restoring the backup process will be missed.

Recovery Options

You have two choices to recover the database, either select the original location or to a new server. I suggest you choose an original location to recover the database, as restoring the database to original location solves the purpose. Now click Recover button to initiate the restore job. 

Wait until the job is completed, the database will be automatically mounted once all done!

Any other option?

Every manual procedure always has an automated way to make the job easier by avoiding the limitations. In case if you don’t have a recently updated backup or database has been corrupted, or any unmounted database which is corrupted; can be restored to the server using Stellar Phoenix Mailbox Exchange Recovery software.

The software doesn’t only just repair the database but also recover and restore the database back to the live Exchange Server 2016. Give demo version a try over here: http://www.stellarservertools.com/recover-exchange-mailbox.php

However, there is a completely free Exchange Server Backup software is also available to backup and restore Exchange Server database. Currently, the software supports up to Exchange 2013. So keep visiting the official website for the upcoming version of the software compatible with Exchange 2016.


Thanks,
Viewing all 133 articles
Browse latest View live