Quantcast
Channel: Exchange Server Blog
Viewing all 133 articles
Browse latest View live

Methods to fix Exchange Server Disk space problems

$
0
0
Of course ‘Bigger is better’ in various cases and it is also very true in case of Exchange Server. Even though with the massive availability of multi-terabyte hard disks, the MS Exchange Server can use huge amount of disk spaces. Otherwise, the flow of email exchange between two email clients may be severely delayed.

So in order to prevent any sort of interruption in the email flow, Microsoft supports the use of dynamic disks for the mailboxes of Exchange Server 2013. But Microsoft also states that basic disks should be used instead of dynamic disks.

From time to time, Exchange expert suggests different ways to increase the disk spaces. Some of the most effective ways are discussed below:

      1)  By Exchange archiving– It is an effective way to reduce the size of mailbox without deleting any content but it require another mailbox database for storage. But it is also possible that your Server may run out of space, and then you need to buy another Exchange license to fulfill your desired space requirement.

      2)   By use of multiple databases- The Exchange Server like version 2010 has made great improvements in the performance and its use of disks. Its gives a new vision for many organizations as large mailboxes can be combined with cheap storage.

From the above mention methods it can be concluded that it doesn’t provide the full-fledged solution of Exchange Server disk space requirement.  However, there are many more highly recommended methods which are discussed below:

 a)  By deleting the data from full databases: One of the easiest ways to reduce the disk space consumption is deleting of the data from the databases. But you can notice that by simply deleting the public-folder or mailbox data won’t shrink the database; you also need to perform an offline defragmentation.

However an offline defragmentation requires quite a bit of disk spaces as Exchange creates a temporary database.  As the process continues; the primary database copies all the data to the temporary database. In short, it means that you require enough free disk space for the smooth running of the whole process.
You need to execute the following command to perform the offline defragmentation.

ESEUTIL /D <database name>

     b)  By adjusting the recovery limits: It is another useful way to reduce disk space consumption by adjusting the mailbox database’s limit. Perform the following procedure:
  • Open the Exchange Administrative Center, selects Servers, then the Databases tab.
  •  Then select a database and click the Edit icon before clicking on Limits.
  • The Limits screen makes you adjust the threshold for keeping deleted data items and mailboxes in Exchange Server. You may also regain some temporary space by adjusting these limits. 
       c)    By changing the database path: In most the cases, the most effective method to recover disk space by changing a database’s path. It is mainly effective when multiple databases are stored on the same volume. You can easily move the database to a volume having plenty of free spaces by changing the database path.

       d)   Run the database maintenance: In this method,MS Exchange Server runs a nightly maintenance cycle which is designed to keep the databases healthy. Some of the most prominent tasks performed during the maintenance cycle are mentioned below:

          ·       Database defragmentation
          ·       Database checksumming
          ·        Page patching
          ·       Page zeroing
          ·       Dumpster cleanup
          ·       Public folder expiry
          ·       Deleted mailbox cleanup

In addition to this, you also need to check your server’s logs to determine whether the cycle finishes or not because it’s common for the cycle to run out of time. If you find that the cycle is not finishing then you need to adjust its schedule to give more time.

NOTE: An online defragmentation does not reclaim disk spaces even if the cycle defragments the database. For that, you need to perform an offline defragmentation.

To sum up as whole, implementation of any of the above mentioned four methods can very easily optimize the disk spaces and can resolve any disk space problem. 


How to fix Exchange Error: 1022 which restricts data access

$
0
0
Most of the organizations, especially the larger ones configure Microsoft Exchange Server as the primary communication medium between e-mail clients. And MS Outlook is among the most popular and preferred e-mail client for organizational business purpose.

This perfect collaboration of Exchange Server and Outlook helps an organization to maintain the smooth exchange of data and information among the huge numbers of employees. However, like any other application Exchange Server also face some technical problems. These problems may be due to virus attack, improper closure of the system or server, or may be due to configuration error.

While working with live Exchange Server you might come across many types of error messages. These error messages may be generated not only because of corruption but also due to wrong operating of Server as well. To make out the exact reason in Exchange Server, let us consider the following scenario:

Suppose that you just start Exchange Server to operate and tries to access the data.  But eventually you will face restrictions in operating the MS Exchange server with following error messages:

Event ID: 482
Source: ESE
Version: 6.5.000.0
Message: %1 (%2) %3An attempt to write to the file “%4” at offset %5 for %6 bytes failed after %10 seconds with system error %8: “%9″. The write operation will fail with error -1022

Symptoms of error 1022: When you encounter the above error messages, you will experience a kind of interruption or halt in between the smooth operation of Exchange Server. Moreover, you might face difficulty in accessibility of data and information across Exchange Server which compels you to do EDB recovery.

Main cause of MS Exchange error 1022: The most possible reason behind the occurrence of error message depicts the I/O disk problem which makes the Exchange Server difficult to operate. Due to stoppage of Exchange Server functionality, users may also face inconvenience in accessing the database.

The error 1022 along with Disk I/O problem occurs due to two possible following reasons:

        a)   When the data present within the Exchange Server is totally damaged.
        b)   When some part of the data is found missing from Exchange Server.

To deal in such a situation, there are numbers of EDB recovery software available online for repair and recover Exchange server database.

One such third party utility is Stellar Phoenix Mailbox Exchange Recovery that very efficiently repairs the damaged EDB files and safely recovers into corresponding PST file. Moreover it is supportive to latest MS Exchange 2013 version with multiple saving formats like PST, MSG, EML, HTML, RTF, PDF etc. 

Exporting Exchange 2010 mailbox to PST with Date Range

$
0
0


This could be a great idea to export data for a particular date range in Exchange Server 2010, rather than exporting complete mailbox only for selective data. Sometime as an Exchange Administrator I need to export only selective mailbox item in a time range for keep the data as backup, or one of the user used to do this for create a monthly archive for a particular mailbox. 

Fortunately, Exchange Server 2010 runs PowerShell command New-MailboxExportRequest filters and export data with a date range. Let’s take an example where I’ll export the entire messages in the report mailbox which have been received in January 2015.

New-MailboxExportRequest -ContentFilter {(Received -lt '02/01/2015') -and (Received -gt '12/31/2014')} -Mailbox report -FilePath \\srv-ex2k13mb01\d$\report_Export_January2015.pst

The above scripts will scan and export all the messages in PST file kept in D drive, which have received before February the 2nd and after December the 31th.

However if you want to customize filter in the above PowerShell command, it isn’t over yet. The –ContentFilter parameters takes bunch of filterable properties to export only desired mailbox data in PST form. Let’s take another example-

Rather than specific date range, you can also export all those email which sent to report mailbox from user JohnPlayer. Run the following command-

New-MailboxExportRequest -ContentFilter {ContentFilter {Sender -eq 'johnplayer@info.com'}} -Mailbox report -FilePath \\srv-ex2k13mb01\d$\report_Export.pst

You can also tweak mailbox export command to export only selective items that match with subject line Deals. Run the following command to execute this-

New-MailboxExportRequest -ContentFilter {ContentFilter {Subject -like *Deals*}} -Mailbox report -FilePath \\srv-ex2k13mb01\d$\report_Export.pst

If you want to export all the messages which sent between a date range, run this exchange cmdlets-

New-MailboxExportRequest -ContentFilter {(Sent -lt '02/01/2014') -and (Sent -gt '12/31/2014')} -Mailbox report -FilePath \\szhex04\d$\report_Send_Export_data_Dec2013.pst

Unfortunately, there is no GUI option available in Exchange Server 2010 for export user’s mailbox data to .pst between certain dates. But the good thing is that you can use cmdlets to export selective data from the mailbox.  

Yet, -ContentFilter parameters has many other filterable properties which you can see here and use them accordingly.

Now as you know there is no GUI option for customize export, therefore Stellar has built a must have software which accomplish this limitations. Stellar EDB to PST converter is the unique software of its kind. You can download this software here, and use it for export mailboxes data into PST form single EDB file on the basis of selective data range, 'From', 'To', 'Cc', 'Subject', 'Importance', 'Body', 'Attachment Name'  and 'Item Type'.

10 Newly Added PowerShell Cmdlets for Exchange 2013

$
0
0


Some Exchange Administrators do the perfect job with the combination of cmdlets on Server, that’s Microsoft is increasing the new cmdlets in Exchange server with the every new release. There are 187 Powershell cmdlets in Exchange Server 2013 alone. With the latest product release of 2012-2013 cycle, Microsoft has added lot of new Powershell cmdlets in Exchange 2013 to help Administrators. So if you’re an Exchange Administrator who is planning to deploy an Exchange 2013 Server, these 10 newly added Powershell commands you should definitely need to know about-

1. Get-ExchangeServerAccessLicense

By running this cmdlets you can get the licensing report information of Exchange Server. You will receive both reports by running Get-ExchangeServerAccessLicense command, Enterprise and Standard edition, and CAL license for Exchange Server 2013. 

2. Get-HealthReport  

You can check the health report of the any component of Exchange 2013. For example, run the belowcmdlets to determine the health report of OWA-

Get-HealthReport –InputEntries OWA –InputObject Maintenance

This command will return you OWA health report by exporting different information.

3. Redirect-Message

Messaging in queue is the very usual problem in Exchange Server that resides on users mailboxes. If you’re getting this with a mailbox server, you can run Redirect-Message Powershell to remove queue from the current mailbox server and add the pending queue to another queue on a healthy Exchange mailbox server.
You only need to source and destination server names to execute this shell command-

Redirect-Message –Server –Target

4. Test-MigrationServerAvailability

Exchange Server is aimed to work as larger distributed application, so businesses might have cloud mailboxes, on-premises mailboxes, and mailboxes which reside in external AD forests. The Test-MigrationServerAvailability command helps to confirm that current Exchange version can communicate with external server before trying a migration process.

5. Get-MobileDevice

By running the command, an Exchange administrator can make a list of all mobile devices which are associated with the current mailbox. E.g. run the below cmdlets to get the list of mobile devise associated with THOMAS mailbox.

Get-MobileDevice –Mailbox "Thomas"

6. Get-MobileDeviceStatistics

Now Administrator can identify the issue with Exchange Active Sync, and can retrieve mobile device log files for analysis. 

Simply run the below Powershell script to identify mobile device statistics for THOMAS mailbox.

Get-MobileDeviceStatistics –Identity Thomas

7. Get-PartnerApplication

Execute the command to see the list of all registered partner application. SharePoint is the best example of partner application, as Exchange 2013 has introduced the concept of partner applications in Exchange server.  

8. Get-ServerHealth

Rather than check the health of selective competent in Exchange Server, Get-ServerHealth cmdlets helps to check the overall health of Exchange Server. You only need to provide the name of domain controller for recognize the Exchange server which you want to analyze. Below is the syntax for that-

Get-ServerHealth –Identity –DomainController

9. Set-ServerMonitor

You can monitor individual server by simply specifying the name of server and monitor.

E.g. Run the below cmdlets to enable the Maintenance monitor for Exchange server RXZ1
 
Set-ServerMonitor –Name Maintenance –Server RXZ1

10. New-PublicFolderMigrationRequest

If you’re upgrading to Exchange 2013 from previous version, Microsoft suggests you to migrate the public folders to Exchange Server 2013. For execute this cmdlets you only require source database and the .CSV file which contains exported public folder figures. (Run Export-PublicFolderStatistics.ps1 cmdlet to create .CSV file). Below is the syntax to execute the command-

New-PublicFolderMigrationRequest –SourceDatabase PF1 –CSVData (Get-Content C:\Data\CSVData.csv –Encoding Byte)

That’s it. However there are 200 newly added cmdlets in Exchange 2013 which helps administrator to make their job easier and faster, but these 10 you should definitely pay attention to if you’re an Exchange Administrator.
Good Luck,

The Exchange Server address list service failed to respond - Fixed

$
0
0


If you’re an Exchange administrator, you had come cross this problem whenever you had tried to perform some changes on users mailboxes, either adding an older mailbox to server, move a mailbox, exporting a new user objects to Active Directory, or creating a newer one on Exchange Server 2007; you have got this error message on your screen -
  

          “The Exchange server address list service failed to respond. This could be because of an address list or email address policy configuration error.”

So today I’ll help you out in troubleshooting the error: Event 6801 - "The Exchange server address list service failed to respond". But before move ahead, I want to share with you the primary reasons why Exchange Server sometime behaves like this.

The only reason is Microsoft Exchange System Attendant Service is not working, or facing any problem that’s why this service is not running.  

To resolve this issue, you just need to restart Microsoft Exchange System Attendant Service again. So currently if you’re getting this error during adding a user’s mailbox to the server, restart the service by-
Enter services.mscin run box and look for Microsoft Exchange System Attendant Service in the list.
Once you find the service, Select Restart.

Check the location of default public folder by navigate through Organization Configuration > Mailbox
Now you need to select here the mailbox that you want to change the default public folder database. Open properties by right click the database.

Click Client Settings tab in mailbox database properties, and click Browse next to Default public folder database.

Now choose the public folder database from the list of public folder database and click OK.

That’s it. Now you will no longer receive address list service failed to response whenever you add mailbox to the server.

But in case if you are trying to create a new mailbox on Exchange Server 2007, make the following changes in EMC (Exchange Management Console). 

Open EMC and go to Organization Configuration.

Now right click in Exchange Management Console and select Modify Configuration Domain Controller. Now point Modify Configuration Domain Controller to your DC hosting the PDC.

Now restart Microsoft Exchange System Attendant Service. So the next time when you will create a mailbox for a new or existing user, you will no longer receive this issue.

That’s it. If you have any query related Exchange server errors, post your questions in the comment box. I’ll try to help you out!

Thanks,

Troubleshooting Exchange Server Migration Problems

$
0
0

As you know, Microsoft Exchange is the email server that manages users’ mailbox data, including emails, attachments, contacts, calendar, notes, and other useful information in both online (i.e. in OWA) and offline (i.e. in Outlook email client) mode. Additionally, Exchange Server is a calendar-cum-contacts manager software, which has been widely used in organizations for exchanging emails containing crucial information. 

That is why different versions of the Exchange Server 2013, 2010, 2007, and few previous ones are available today. In fact, whenever a new version is launched, organizations do migrate their current exchange database to the new one, based upon the requirements and newly added features. However, Exchange migration process does not always end successfully, but sometimes it terminated automatically due to some unknown errors. 

Following error message encountered in the Synch Issue folder when using MS Outlook 2003 to synchronize offline address list on the server running Exchange 2010, Exchange 2007, or Exchange 2003: Check that below- 

Exchange Server Error


“0x8004010F An object could not be found.”

Whenever this error occurred, you are no longer able to send email messages. If you try to send emails, you get another error, i.e.

“Task ‘Microsoft Exchange Server’ reported error (0x8004010F): ‘The operation failed. An object could not be found.’”

Causes of Error


By just looking at the error message, you certainly cannot figure out the causes behind it. However, since the administrator is to manage the exchange server, he must be able to get the error fixed. Well, digging deeper enlightens the following two scenarios when this error is encountered:

Scenario 1: While viewing Properties in the Address lists setting in Exchange System Manager with any of the following conditions is true:

(I) The offline address book list object has a missing address list.
(II) The offline address book list object has an incorrect address list.

Scenario 2: While viewing Properties in the Offline address lists setting in Exchange System Manager with any of the following conditions is true:

(I) The offline address book list object has a missing address list.
(II) The offline address book list object has an incorrect address list.

Fixing the Error


For Scenario 1


1. In Exchange System Manager, click to expand the Recipients container and highlight the Offline Address Lists container.
2. At the right, right click the offline address list and choose Properties in the context menu.
3. In the General tab, check if the list populated under Address lists is valid. If not, you have to add one.
4. Click OK.
5. Now, right click the offline address list object and click Set as New Default if it is not set.
6. After making these changes (if any), right click the offline address list and choose Rebuild.

For Scenario 2


1. In Exchange System Manager, click Properties for the mailbox store to make sure that in Offline address list on the General tab the offline address list is populated with a valid offline address list object. If not, then click Browse and select a valid one.
2. Try sending email from your Outlook 2003.
3. If it does not work, try it again after a re-login into Outlook.

After this, you do get the issues fixed for sure. However, in case the same issues persist, there might be some corruption is Exchanger Server database. To fix that, you must get a professional Exchange server recovery software. However, choose the recovery software wisely, as wrong software may result adversely.

Ways to migrate different multiple email accounts to Office 365

$
0
0


Due to the significance usage of emails and inbox components like calendar, contacts, task list etc., migration of e-mails accounts from one system to another has become very essential than ever. With few convenient steps one can easily migrate their emails, inbox items as well as mailboxes from server to server.

So today I am just going through the procedure to shift emails and mailbox contents from one email system to Office 365; whether you’re using Exchange Server or any IMAP system Gmail, Yahoomail, or etc. Following is the different ways which you can use to migrate multiple mailboxes to Microsoft Office 365:

1)      Migration of Mailboxes from Exchange Server:  The administrator can migrate all emails, contacts and related stuff from an existing on-premises Exchange Server environment. For this, there are three types of email migration which are as follows:

a)      Cutover migration (In this all the mailboxes are migrated at once): This type of mailboxes migration is applicable to Exchange 2003, 2007, 2010 and 2013, only if there is up to 2000 or lesser mailboxes.

b)      Staged migration (In this migration of mailboxes occur in batches): This type of migration is used when you are running Exchange 2003 or Exchange 2007, and if you have to migrate more than 2000 mailboxes. 

c)       Hybrid migration (By using an integrated environment between Exchange Server and Office 365): Make use of this type of migration when you have to maintain both on-premises and online mailboxes in your organization and migrate users and emails to Office 365 gradually. Moreover, use this type of migration in following situations:

·         If you have Exchange 2010 and more than 2,000 mailboxes.
·         If you have Exchange 2010 and want to migrate mailboxes in small batches over time.
·         You have Exchange 2013.

2)      Email Migration from another Email System: For thisyou need to use IMAP through which you can migrate email from Gmail to office 365 etc. that are supportive to IMAP migration. But by using IMAP migration you can only migrate user’s inbox or other mail folder. Calendar items, contacts and tasks can’t be migrated with IMAP. 

One thing to note that IMAP migration doesn’t create mailboxes in Office 365. Here you’ll have to create a mailbox for each user before you can begin to migrate their email and as soon as email migration is done, any new mail sent to the source email isn’t migrated. 


Following is a complete step by step procedure through which you can easily perform migration from Gmail or Some other IMAP enabled email system.

1.       Make your server in operation mode and acquire the information you need to migrate and then verify your domain with your domain registrar.

2.       Let the users know about the email migration by giving the information about what sorts of tasks need to be done before, during and after migration.

3.       For migration of mailboxes you require an administrator account that has got several permissions. So set up admin credentials or reset email’s password.

4.       Make a list of mailboxes which you wish to migrate in a CSV file format. This file contains the list of email addresses, usernames, and passwords of mailboxes.

5.       In order to migrate to Office 365 from an email system, you need to establish a connection between each other. For this Office 365 uses a migration endpoint.

6.       Perform the migration of mailboxes by creating a migration batch, and then start the migration. After the migration batch is run, verify that the email was migrated successfully or not.

7.       You can also optimize email settings, however this is optional. 

8.       Now you can begin routing email to Office 365. For this you need to change a DNS record called MS record.

9.       Then after verifying routing, stop email synchronization by deleting the migration batch.

10.    Now you can send a welcome letter to users.

Recovering deleted items from Public Folders in Exchange 2013

$
0
0


Exchange public folders by default store in Public Folder Mailboxes. So if you delete any item or content from the public folder, it directly goes to Dumpster where they are retained according to the retention settings. However, 14 days is the by default settings in Public Folder Dumpster.

So today I am exploring different recovery situation which arises with working on public folders in Exchange Server 2013.

Take scenario 1: Recovery of items deleted from public folder

If retention period is not passed yet, you can easily recover public folder deleted items using Microsoft Outlook. Open Microsoft Outlook and click Recover Deleted Items option under Folder menu. By clicking on the icon it will show you the new window which contains the list of deleted items. Now use the normal selection and Recover Selected Items functionality to recover those items.

Take Scenario 2:Recovery of itemswhich have passed retention period

Once the retention period is over, the only recovery option is to restore the last complete backup for the database which hosts the related public folder content mailbox. You only need to run the below Powershell to complete the recovery once restore process is completed.

New-MailboxRestoreRequest –SourceDatabase "Enter here the name of Recovery database"–SourceStoreMailbox "mailbox containing affected public folder"–TargetMailbox "mailbox to which data is recovered"–AllowLegacyDNMismatch –IncludeFolders "name of concerned folder"

By running the above script, all your deleted mailbox data will be recovered to the concerned folder.

Public Folder recovery using Exchange Shell command

Public folder recovery using PowerShell is a quick way rather than using MS-Outlook. So take a case where you need to restore a deleted public folder to the root but you’re not the owner of that public folder. To do this, run the command-

Get-PublicFolder –Identity “\NON_IPM_SUBTREE” –Recurse | FL >C:\publicfolder.txt

It will create a text file publicfolder once the command is run. Now open this file and look for the public folder path. For example Folder1 is the deleted folder, so I will look for the Folder1 in the text file. It will look ahead Identify column.

Identify : \NON_IPM_SUBTREE\DUMPSTER_ROOT\f725f5b1-52ab-43df-83b4-2b3efa0a2ofd\Folder1

Now open Exchange Management Shell and run the script-

Set-PublicFolder –Identity “\NON_IPM_SUBTREE\DUMPSTER_ROOT\<GUID>\Folder1” –Path “\” –Verbose

That’s it! Now open Microsoft Outlook and find the public folder which you want to recover.

RecoveringPublic Folder recovery which have passed retention period

Once retention period is over, it becomes a challenging task to recover a public folder which has been removed from dumpster. Again you will need to restore entire last backup to recover deleted public folder. Run the command once you have restored the database to the Recovery Database. 

New-MailboxRestoreRequest –SourceDatabase "Enter here the name of Recovery database"–SourceStoreMailbox "mailbox containing affected public folder"–TargetMailbox "mailbox to which data is recovered"–AllowLegacyDNMismatch –IncludeFolders "name of concerned folder"

Now before moving ahead, check few mandatory conditions-

1. The data which you are recovering through the process will not create folder automatically, so first you need to create ‘target’ folder in the target mailbox.
2. Also check that your Exchange Server Version (MSE 2013) is fully updated with Cumulative Update 2, so that there would be no chance of permission issue.

Let’s take an example, I have folder Office Data which cannot be recovered as it has been expired, so I need to recover it by restoring last backup.

First, I created Office Data target folder in the target public folder mailbox to which the data is being restored. Once the dataset has been restored, run the PowerShell-

New-PublicFolder –Mailbox “Mailbox name” –name “Office Data”

Now run the commands in a row-

New-MailboxRestoreRequest –SourceDatabase “Enter here the name of Recovery database” –SourceStoreMailbox “mailbox containing affected public folder” –TargetMailbox “target mailbox to which data is recovered” –AllowLegacyDNMismatch –IncludeFolders “name of concerned folder”
Get-MailboxrestoreRequest | Where { $_.Status –eq “Completed” }

Now run the command to confirm restore process is completed.

Get-MailboxRestoreRequestStatistics

Now open Microsoft Outlook to check all restored items. You can certainly see the recovered items item in public folder.

That’s it. However, there is also an alternate method to recover items from public folder if retention period is not over. Try Stellar Phoenix Mailbox Exchange Recovery software to restore any types of item from public folder mailbox in Exchange 2013.

Event IDs 486, 455, 413: Not Mounted Exchange Database

$
0
0


When you try to mount a user database on Exchange Server, you may come across Exchange Error 1811 corresponds to JET_errFileNotFound. The following message will appear on your screen-

An internal processing error has occurred. Try restarting the Exchange System Manager or the Microsoft Exchange Information Store service, or both.

ID no: c1041724

Exchange System Manager

You will get following events in the Application log-

Event ID: 486

Description: An attempt to move the file "E:\Program Files\Exchsrvr\mdbdata\E00.log" to "E:\Program Files\Exchsrvr\mdbdata\E000080A.log" failed with system error 2 (0x00000002): "The system cannot find the file specified." The move file operation will fail with error -1811 (0xfffff8ed).

Event ID: 455

Description: eseutil (4724) Error -1811 (0xfffff8ed) occurred while opening logfile drive_letter:\Program Files\Exchsrvr\MDBDATA\E00.log.

Event ID: 413

Description: Unable to create a new logfile because the database cannot write to the log drive. The drive may be read-only, out of disk space, misconfigured, or corrupted. Error -1811.

However, there is following causes responsible for the error in Exchange Server during mounting the database, but the key reason could be the inequality signature and LGeneration. If the Exchange log file (E00.log) has mismatching signature, you cannot mount the database even if the database is consistent. To resolve this, contact Microsoft Product Support Services (PSS) at http://support.microsoft.com

Another cause is accidentally deletion or quarantines of Exchange log file by Antivirus software. To resolve this, first you need to examine the configuration of antivirus software-

Double-check that the antivirus is not scanning Exchange directories. Check the guide to get the information about how to check and configure antivirus to work together with Exchange Server. https://support.microsoft.com/en-us/kb/823166

 Now review Antivirus software log file to verify Exchange log file has been deletedor quarantined, and try to recover Exchange log file using following methods- 

If Exchange log file has been quarantined...

First, recover Exchange log file to the production log folder and start Microsoft Exchange Information Store service. Now your database will be mounted if there is no more missing log file, but if there is few other missing log files; check missing log file in quarantine folder of the antivirus software. But in case if you cannot locate those missing log file in quarantine folder, try the below method-

If Exchange log has been deleted…

As you didn’t find log file in quarantine folder of the antivirus, it means log file is deleted. Now restore storage group database from backup.

Copy all unstable databases to backup folder. If new Exchange log file E00.log has been created, copy this file and all other log file to the backup folder including E00.chk.

Now change the name of E00*.log to E00.log and restore database from the backup. This method brings your database to consistent state and now this database can be mounted on Exchange Server.

But in case if there is no backup or you cannot restore database from the backup, try Stellar Phoenix Mailbox Exchange Recovery software to extract inaccessible and selective Exchange .edb file and bring it to consistent state. That’s it. 

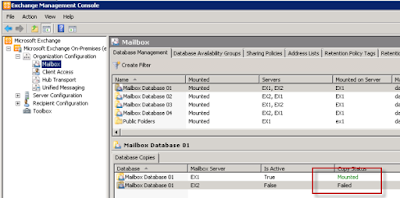
Reseeding a 'Failed and Suspended' Mailbox Database in Exchange 2010

$
0
0


Usually, there comes a state in Exchange server 2010 where Exchange server mailbox database status shows as 'Failed and Suspended'. It indicates that there is any possible issue in mailbox database which needs to be rectified by an Exchange admin. But, the replication service doesn’t sometimes check whether this error has been resolved or not, so as an administrator you need to figure out this issue using shell command before the mailbox database replica can be restored to again a healthy state.


So today I am sharing the easy solution to reseed a failed mailbox database copy in Exchange 2010. 


To initiate the fix, first run the Get-MailboxDatabaseCopyStatus powershell to determine the current status of copy of mailbox database. 

By running the command it will show you all the information (and status) about all replicas of mailbox database and all copies on server.

Run the command to check the status of all the mailboxes copy on a particular database-

Get-MailboxDatabaseCopyStatus -Identity <databaseName>

Once you’ve all the information about database copy, check the System log and Application log for event that may provide you more information about the origin source of the error. 

You can also check Operations Manager for additional info about the causes of the error.

If the database is in offline mode from a long time, you will need to reseed it. But before reseed the replication to the database, you need to suspend the copy of database using the following shell command-

Suspend-MailboxDatabaseCopy <databaseName>\<ReplicaServerName>


Now run the powershell to reseed this database copy-

Update-MailboxDatabaseCopy <databaseName>\<ReplicaServerName> -SourceServer <ActiveServerName> -DeleteExistingFiles:$True

The complete reseeding process may take longer time depends on the size of current database copy. Once it will complete the process, it will automatically resume replication for the database replica, or run the command to resume database copy-

Resume-MailboxDatabaseCopy <databaseName\<ReplicaServerName>

However, you can run the below command if you want to stop update from automatic resume-

Update-MailboxDatabaseCopy -Identity "Mailbox Database 01\EX2" -DeleteExistingFiles –ManualResume

That’s it. By following this guide you can reseed any failed mailbox database copy in Exchange Server 2010.

Mailbox migration failed after cannot open 'System Attendant Mailbox Error' in Exchange 2013

$
0
0


If you have ever migrated mailboxes on Exchange 2013, you had surely come across this error when you try to move a mailbox and move request fails immediately with the error message-

"Cannot open mailbox /o=Test Lab/ou=Exchange Administrative Group (FYDIBOHF23SPDLT)/cn=Configuration/cn=Servers/cn=MY2013Server/cn=Microsoft System Attendant"


Well, this error occurs if the System Attendant Mailbox service is currently not accessible. But this is not server side error; actually Microsoft has done few architectural changes in Exchange 2010 by removing System Attendant Mailbox from the first database when you install Exchange 2010 Server. However, directory object still exist in configuration partition. And same changes also have been applied on Exchange 2013. 

But for Exchange Server 2013, the new architecture now depends on new arbitration mailbox for mailbox move-

“Migration.8f3e7716-2011-43e4-96b1-aba62d229136”

Now, there may be two scenarios for the errors; either the first database mailbox is dismounted, or the migration mailbox is hosted in an offline database which is no more available due to a server crash.

Here I take the first scenario. If the first database is dismounted and the error occurs with Event ID 1006, try the below fixed-

As we know now there is no System Attendant Mailbox pointing to any database, so you can rename the default database for administrative purpose. There is no risk or data loss by renaming it, but of course having offline database may causes several issues. But make sure you have kept a note of what role the database is holding before renaming the default database name.

So if you have renamed the default database, you can go head ahead and mount the store. Now you can easily move mailbox in Exchange 2013 without any error or warning.

Now I take the second scenario where mailbox is stored on an offline database which is not available because server has been crashed. To resolve this, I have done some homework and created two powershell command for moving mailboxes. But before executing the shell commands, do the following-

Firstly, you need to recreate the mailbox again. To do this, you need to deleted AD object and run Setup.exe/PrepareAD. By executing the procedure, it will recreate AD object.

Once the AD account is created, you can run below commands to configure a mailbox for the account (or, mailbox enable the new AD object)-

Enable-Mailbox -Arbitration -Identity "Migration.8f3e7716-2011-43e4-96b1-aba62d229136"

AND

Set-Mailbox "Migration.8f3e7716-2011-43e4-96b1-aba62d229136" -Arbitration –Management:$true

That’s it. These are two simple solutions to resolve this error. 

So follow the steps, and try again to move the mailbox. I believe you have done now!

Fixed: Mailbox move/restore Fails with Error 1056749110

$
0
0


You may surely come across Error 1056749110 if you’re restoring, moving or migrating Exchange mailboxes on the server. Following is the error message-


Restore-Mailbox : Error was found for RSG, Test because: Error occurred in the step: Moving messages. This mailbox exceeded the maximum number of corrupted items specified for this move mailbox operation., error code: -1056749110  

Usually, this error occurs if there is number of corrupt items in mailbox. And, when you try to restore or move, execution fails after certain limit. However, you can use 3rd party tool for restoring or moving mailboxes, but I have few manual methods too which works appropriately in the case. Try this-

In the scenario, I want to restore a mailbox from RSG to a production mailbox by running the command:
Restore-Mailbox -RSGMailbox “RSG, Check” -RSGDatabase My-Exch\RSG_DB\db22 -id “Recovery, Mailbox” -TargetFolder “All the recovered emails of RSG mailbox”

In the above command,

RSG, Test is themailbox in the RSG database for which mailbox items need to recover.

My-Exch\RSG_DB\db22 is the Name of Server\Name of Recovery Storage Group\ Mailbox Database Name

Recovery, Mailbox is the name of the mailbox where backup should be restored.

All the recovered emails of RSG mailbox is the folder that will be created through the process into which the mailbox RSG, Check will be restored.

So if you’ve run the above PowerShell, you’ve surely encountered this command is failed! Why? Because you need to add BadItemLimit switch in the command as there’re several corrupt items in the mailbox. So, I am adding a new parameter in the same command to test in again.

Now run the below modified shell command-

Restore-Mailbox -RSGMailbox “RSG, Check” -RSGDatabase My-Exch\RSG_DB\db22 -id “Recovery, Mailbox” -TargetFolder “All the recovered emails of RSG mailbox” –BadItemLimit 1000

In the above command, the BadItemLimit switch/parameter specifies the total number of bad or corrupt item in the mailbox which will be skipped. You can put any valid input for this parameter as per your case. In the above command, 1000 bad items will be skipped by executing the process.

That’s it. It will restore the mailbox even if the mailbox has 1000 corrupted items. But again, you can increase the value of the switch if number of the bad items is more than 1000.

However, this solution works for all scenarios. But in case if the given solution didn’t help you out, you need a prominent Exchange database recovery software.  This utility guaranteed works in case of recovery of bad item or items from corrupt mailboxes. So, just download the software to resolve the Exchange restore/move fails with Error code1056749110.

Thanks,

Fixed: Exchange Server Jet Error 1216 (JET_errAttachedDatabaseMismatch)

$
0
0


Exchange Jet Error 1216 is amongst the most common issues which anonymously occur when you try to mount database in Exchange Server, and unluckily you encounter the error message:
'Error -1216 (JET_errAttachedDatabaseMismatch)'

Other possible reasons could be lost or corrupt Exchange database files, network problems, or some important files which are required to work Exchange Server, has been deleted or altered! 

In another scenario, if you notice storage group stops working all of sudden, then it is also possible all of the Exchange mailbox database will become inaccessible and inconsistent. In the case, you will find the following error message in the event log of the application-

“Event Type: Error
Event Source: ESE98
Event Category: Logging/Recovery
Event ID: 0
Date: 7/8/2015
Time: 9:23:56 AM
User: N/A
Computer: LocalExchange

Description: Information Store (4312) Database recovery failed with error -1216 because it encountered references to a database, ‘C:\ localexchange \mdbdata\PRIV3.edb’, which is no longer present. The database was not brought to a consistent state before it was removed (or possibly moved or renamed)” 

Now you can easily find out whether the file is renamed or missing, else the file is become inconsistent.
So below I am sharing few quick methods to fix Exchange server jet error message.


How to Fix Exchange Server Error -1216

Eseutil is really an excellent inbuilt utility in Exchange Server which can be used to resolve the issue by running the below commands against the file.

Run the below command to recognize either the file is inconsistent or not-

eseutil /mh name_of_database | find /i "consistent"

If you’re running Exchange Server 2010/2007/2003, check the state of the database file by executing the below command-

eseutil /mh name_of_database | find /i "Shutdown"

Now you can check the returned output and run the Eseutil command to repair the database file. But before executing the commands (Eseutil/P, Eseutil/d, after that isinteg -fix), make sure that all of the logs must be available to effectively repair and recover the database.

But it case if the Eseutil fails to repair the database, you may encounter the following error message-
Operation terminated with error -1216 (JET_errAttachedDatabaseMismatch, An outstanding database attachment has been detected at the start or end of recovery, but database is missing or does not match attachment info) after 2.551 seconds.

So if Eseutil is unable to help you out, you need a prominent tool for troubleshooting Exchange server Jet Error codes, and repairs & recover Exchange Server database.

Try Stellar Phoenix Mailbox Exchange Recovery software to resolve 1216 Jet Error, and restore the inaccessible mailbox database from inconsistent state. You can also repair and recover corrupt or lost mailbox from .edb file using this utility. For more information, you can download and check the features of this software here at: http://www.stellarservertools.com/recover-exchange-mailbox.php

Please revert if you have further queries on the discussed error.

Thanks,

Troubleshooting Exchange Server Sync Error 0x80040119

$
0
0


There are different causes and circumstances behind the unknown error code 0x80040119 in Exchange Server environment. Among the various conditions, error 0x80040119 mostly occurs due to synchronization problems between Microsoft Outlook and Exchange Server. But it is also occurred if you’re upgrading Exchange.


As an administrator, it might be your priority and responsibility to keep the systems up and running. It means you have to keep your end users up and running. So today in this blog, I will focus how to fix Exchange 0x80040119 error code so that you can keep end-users connected and as productive as well. 

So, take a scenario where an administrator has hundreds of users, who are receiving reference error code 0x80040119. This error code usually indicates about client operation failures or synchronization issues. This email error massage display like-

Synchronizer Version 11.0.6352
 Synchronizing Mailbox ‘Tom, Moody’
 Synchronizing Hierarchy
 Error synchronizing folder
 [80040119-501-0-5C0] The client operation failed.

To overcome from this issue, there are multiple diagnostic and troubleshooting tips to fix Exchange sending and receiving reported error 0x80040119. Let’s start with the easiest one-

Simply recreate the Outlook profile for those users who’re facing the issue. This solution works sometime as I had tested that in past.

Alternatively, you can also try the following-

Navigate to Tools -> Account Settings, and choose your current Exchange account, and click on CHANGE. Click More Settings, then Advanced.

Now uncheck ‘Download public Folders Favorites’ under Advanced tab, and OK. Click Next and Close the window.

This is the recommended solution if you have to fix this issue for 2 or 3 users. But what if you have to do the same for more than 100 users? That’s why backup and replicas are important for Outlook and Exchange environment. You can easily restore information of numbers of users in single attempt, rather than wasting time on manually rebuilding user profile information.

But as I had already mentioned above, there are several ways to diagnose and resolve error code 80040119.

Sometime this error code generates-

Failed to locate correct profile. Please close Outlook, open Outlook, andsynchronize again. ERROR: 80040119 Communication Failure (80040119,4011). 

For Windows 7, Vista
Windows XP

Open C:\ Drive and search ‘mapi32.dll’ in advance search.

By default, this file is located in C:windows/sysem32, now change it from .dll to .old

Now open Outlook and wait for 2 minute. If you get any message, click Yes to repair the problem.

Wait 1 minute and restart your Outlook client.

Now Sync again. 


Search ‘mapi32.dll’ in File and Folders, or check C:\winnt\system32 (depends of current Windows  version), and rename it to Mapi32.old


Now open Outlook and wait for 2 minute. If you get any message (Recently installed program), click to repair the problem.

Wait 2 minute and Sync again.


Thanks,

Reasons to Migrate from Exchange 2007 to Exchange 2010

$
0
0


MS Exchange Server is a Microsoft-developed email server that stores and manages your mailbox data including emails, contacts, calendar, and more. Since Exchange Server is a member of Microsoft server line of products, it runs Windows server operating systems. In fact, Exchange Server is the most popular and preferred email server, which is evident from its several versions (Exchange Server 2013, 2010, 2007, 2003, and previous ones) that are available today. However, each new version includes some brand new as well as upgraded features, which enforce exchange users to upgrade to the newer version. 

Well, the post is to enlighten the advantages of a formal upgrade to Exchange 2010 from its predecessor Exchange 2007. Before that, let us have a glance at the key features of Exchange Server 2007:

Exchange Server 2007 was released to corporate as a bundle of new and exciting mailing features, viz. high scalability support, voice mail integration, integrated web search and support, enhanced filtering tools, and the last but not the least, a brand new OWA (Outlook Web Access) interface. Besides, this version of Exchange Server features Transcript Security Layer (TSL) encryption technology, which encrypts emails sent within a local Exchange Server 2007. 

However, certain needs like larger data storage space and enhanced exchange database security demand for Exchange Server migration. Well, the additional advantages of Server migration are:

a) Newer version of Exchange Server (i.e. 2010) offers enhanced database storage capacity

b) Quick and easy sharing of calendar with other users on same or different exchange servers

c) Taking backup of Exchange mailbox data

d) Exchange Server 2010 features storing mailbox data in cloud and certain other websites, which minimizes organization cost

e) Exchange Server 2010 features data storage on external servers, which is termed as visualization.

Well, apart from the aforementioned advantages of migration from Exchange Server 2007 to Exchange Server 2010, the process is quite risky. In fact, following are the steps to follow during Exchange migration process:

1) Single user’s mailbox migration
2) Multiple users’ mailbox migration
3) Public and Private EDB files migration
4) Log files migration

Well, in order to migrate from Exchanger Server 2007 to Exchange Server 2010, you can use its inbuilt Move Mailbox Wizard, as Exchange 2010 implements online mailbox migration. However, the process is quite risky and may result in Exchange mailbox data corruption. 

So, you do not have to fuss over the issue, as you can do migration of Exchange 2007 mailboxes to Exchange 2010 or directly to a live Exchange Server. There is a utility calledStellar Mailbox Extractor for Exchange Server, which is specially designed to export online as well as offline Exchange Edb file to another Exchange Server. 

So rather than following a manual procedure to migrate Exchange server mailboxes to Exchange 2010 or other latest version, I always suggest to use the mailbox migrator utility, as it is risk free, fast, & no more PowerShell skills are required for migration. 

Hope, this blog post has given you more reasons to migrate to Exchange 2010, and the best way to migrate Exchange EDB mailboxes to a live Server.

Thanks,

Fixed: Slow Mailbox Migration Issue in Exchange 2013

$
0
0


Moving one mailbox on Exchange 2013 is an easy task for an administrator but when an admin migrate lots of mailboxes, slow mailbox moving issue occurs on Exchange Server. However, with simple steps, you can fix the slow migration issue and increase the speed of user’s mailbox in your Exchange Server environment. 


So today I am sharing few steps to increase the speed of mailbox migration on Exchange 2013; especially when you have to quickly migrate lot of mailboxes. Follow the steps accordingly-

1. Initially, validate the protocol connectivity

Run the command to verify the protocol connectivity, but also check firewall is not blocking your Exchange Server network if your server is distributed through the WAN (Wide Area Network).

Command: Test-MapiConnectivity -Identity John.p@mail.com | fl

If you find any error after executing the command, check that arbitration mailbox are placed appropriately on the relevant Exchange server.

Execute the below PowerShell to check the details-

Get-Mailbox -arbitration|fl Name, recipienttypedetails

2. You have noticed migration speed of single mailbox is always multiple times faster than migrating 50 of hundred plus mailboxes. To fix the delay, change the value in the MSExchangeMailboxReplication.exe.config. You can locate this file at the following path:

c:\Program Files\Microsoft\Exchange Server\V15\Bin\MSExchangeMailboxReplication.exe.config
Now change the value in file-

MaxActiveMovesPerSourceMDB = "75"   
MaxActiveMovesPerTargetMDB = "75"   
MaxActiveMovesPerSourceServer = "120"   
MaxActiveMovesPerTargetServer = "120"   
MaxTotalMovesPerMRS = "120"

Once you’re done, don’t forget to restart the MSExchangeMailboxReplication service.

3. If you’re using Exchange 2013 SP1, check that if there is content index error on mailbox database copies. Disable the index and execute the command to see the difference-

Get-MailboxDatabaseCopyStatus  | ft name, status, contentindexstate,contentindexerrormessage
Set-MailboxDatabase DB -IndexEnabled:$False

4. Check that TCP Chimney is Disabled or not.

Netsh int tcp show chimneystats

If "Supp" value is NO, it means TCP Chimney is either not enabled or not supported. Else, it will show "YES" with some values on "TMax" and "PMax"

For disabling TCP Chimney:
netsh int tcp set global chimney=disabled

However, there are few shell commands too for evaluating the mailbox movement. Clickhere to check it.

Otherwise, try an automated way to migrate Exchange mailbox using an Exchange mailbox migration tool. It will fix the slow migration issue and increase the speed of migration between servers without altering any settings on your Exchange environment. You can download Stellar mailbox migration tool by visiting here: http://www.stellarservertools.com/exchange-mailbox-migration.php. And, migrate the mailboxes without any failure or slow moving rate. Thanks!!

Repair Corrupt Exchange 2016 Mailbox: New-MailboxRepairRequest

$
0
0


I’ve already posted multiple ways to repair Exchange 2010/2013, but I never published how to repair a corrupt mailbox in Exchange 2016. Ofcourse, Exchange 2016 is very new topic among all Exchange administrators; still many of us are not aware with new changes in Exchange 2016. So before moving ahead, it is recommended to check what’s new in Exchange Server 2016

So today I’m shading light on repairing corrupt mailbox on Exchange Server 2016. However, Microsoft isn’t released Exchange 2016 yet, but still you can try its preview version to test new features and apply new PowerShell commands.

The PowerShell (cmdlet) use in the blog post is only works in on-premises Exchange Server 2016, not any other previous version! 

Let’s go ahead-

New-MailboxRepairRequest

This cmdlet is especially designed to detect and fix corrupt mailboxes on Exchange 2016. You can run this command against database or a specific mailbox. But if you’re running this command against Exchange database, only the mailbox being repaired is interrupted. All other mailboxes on the database remain the same.

So, in the below scenario I’ve taken a mailbox john@exchange.com

Run the below shell command to detects and repairs all folder views for the mailbox

New-MailboxRepairRequest -Mailbox john@exchange.com -CorruptionType FolderView

Let’s take another mailbox Nixx tounderstand few other examples for New-MailboxRepairRequest PowerShell-

1. If you only want to detect and report ProvisionedFolder and SearchFolder corruption issues to Nixx mailbox, execute the below script-

New-MailboxRepairRequest -Mailbox Nixx -CorruptionType ProvisionedFolder,SearchFolder –DetectOnly

2. For repairing AggregateCounts on mailbox database MSE-DB12 for all the mailboxes; run command-

New-MailboxRepairRequest -Database MSE-DB12 -CorruptionType AggregateCounts

3. If you’ve found lot of corruption types in Nixx mailbox, you need to run the command to detect and repair all the corruptions type for Nixx mailbox and achieve.

New-MailboxRepairRequest -Mailbox Nixx -CorruptionType ProvisionedFolder,SearchFolder,AggregateCounts,Folderview –Archive

4. Let’s take another example to create a variable that identify Nixx mailbox

$Mailbox = Get-MailboxStatistics Nixx

Now I am using this variable ($mailbox) to identify the values for the Database and StoreMailbox parameters to generate a request to identify and repair all corruption types-

New-MailboxRepairRequest -Database $Mailbox.Database -StoreMailbox $Mailbox.MailboxGuid -CorruptionType ProvisionedFolder,SearchFolder,AggregateCounts,Folderview

So, we’ve seen above few examples of New-MailboxRepairRequest PowerShell. Now you can check what types of cmdlet can be used to detect and fix mailbox corrupts-

  •  Search folder corruptions (SearchFolder) 
  •  Aggregate counts on folders that aren't reflecting correct values (AggregateCounts) 
  •  Views on folders that aren't returning correct contents (FolderView) 
  •  Provisioned folders that are incorrectly pointing into parent folders that aren't provisioned (ProvisionedFolder)

Note: You need to assignpermission before executing these cmdlets, so first check what permission you need to repair a corrupt mailbox.

As Exchange 2016 final release is months away, so this topic is only applicable for administrators who wanna try Exchange Server 2016 Preview.
Good Luck,

Moving Mailboxes in Bulk on Exchange Server 2010

$
0
0


Moving mailboxes in Exchange 2010 is easier task until you’re moving only one or few mailboxes. But if you’ve to move mailboxes in bulk, I’m sure the mailbox moving process could be long and bit hard for lots of administrators. 


Last week, I was also searching the quickest solution for the same concern and got something very interesting to make the mailbox moving job easier and quick. 

So, based on the result and process, I’m just sharing with you the quick steps to move mailboxes on Exchange Server. However, I will also suggest you a perfect tool for moving mailboxes in bulk on Exchange 2010 but it is worth to give PowerShell a try before move to Exchange mailbox moving software. Let’s check it out-

Before executing the commands, first create an excel file to save mailbox users names with their display names and their targeted Exchange server database for your convenient.

Now open a notepad.exe and do some updation on scripts as showing below-

Type “user,databasewithout quotation. 

Then, go to second line and type user name and desired database (store) with comma.
E.g., it will look something like-


Now just save the notepad file as .CSV on the following directory-

C:\MailboxMove

Now you’re almost done, just again open Notepad and copy the below scripts into it-

$Userstodatabase = import-csv C:\MailboxMove\MM.csv
foreach ($Record in $Userstodatabase)
{
$users = $record.user
$database = $record.database
New-MoveRequest –identity $users –TargetDatabase “$Database”
}

Now just save this file as PS1 and execute this file using EMS (Exchange Management Shell). That’s it!
This will move your all mailboxes shortly depend on the mailbox size. However, you can also check the status of the process by running a script.

Copy and save the below script as PS1 and run it using Exchange Management Shell.

$Userstodatabase = import-csv C:\MailboxMove\MM.csv
foreach ($Record in $Userstodatabase)
{
$users = $record.user
Get-MoveRequest –identity $users
}

By running the above file, it will show you the current progress of user’s mailbox in a .CSV file. However, it worked for me in few attempts. But I’m not sure if it works for every case, as I got it from an anther online resource.

So, it is advisable to try the above tips but always keep an Exchange mailbox extraction tool in case of any urgency or if nothing works for you. I’m suggesting you here software for moving mailboxes in Exchange Server 2010 as well as 2013, which can be downloaded by visiting the URL: http://www.stellarservertools.com/exchange-edb-pst-converter.php
 
Just export the mailboxes from .edb file to PST or directly import EDB data on a live Exchange mailbox. 

Hope, this article helps you in moving bulk Exchange mailboxes for sure. 

For any query related to Exchange mailbox migration or recovery, post your comment below!

Thanks & All the Best!!

10 Reasons to Migrate Older Exchange Server to Office 365

$
0
0


The popularity of Office 365 is getting higher from day to day; not because of its functionality to anywhere access but its compatibility with other email server platform. Whether you’re using Exchange 2013/2010 or any other on-premises Exchange Server version, with few simple steps you can easily migrate all your Exchange mailboxes to Office 365 account.

So today I’m shading light on the key reasons why it is the right time to leave your on-premises Exchange Server in the past and move to Office 365 on the cloud. Let’s see bigger picture-

1. No More Server Maintenance 

Now you don’t need to worry about server maintenance cost and unnecessary headache.  With the evolution of Office 365, it has taken over the decade of Exchange administrator’s pain by completely eliminated local servers and the fear of data loss & security. With the presence in the cloud, Office 365 has become even flexible and secure than all Exchange Server versions. However, you can always integrate to on-premises solution if it is needed.

2. Anywhere Access from Any Device

The key advantage of having Office 365 account is that you can access your email account from anywhere in the world using any device like tablet, mobile, and laptops. 

3. Migration is Easy

Migration from Exchange Sever to Office 365 is even easier than migrating to Exchange Online. See here how easily you can migrate your older Exchange server mailboxes to Office 365-


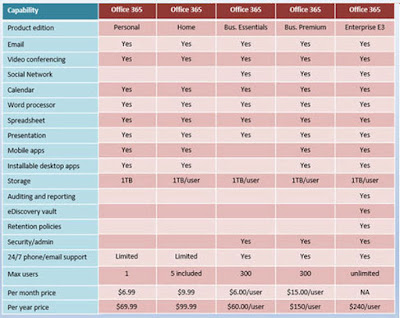
4. Wide Range of Plans, Packages and Price

Microsoft Office 365 comes with some affordable and not to affordable plans, both J. So choose the plan wisely that best match your business needs. 

It comes with Office 365 Personal, Home, Business Essentials, Business Premium, and Enterprise E3 editions. 

You can compare its features and price accordingly in below snapshot-

reasons-to-migrate-to-office-365


5. Maximum Uptime

There is guaranteed 99.9 % uptime service agreement between clients and Microsoft.  However, as per Microsoft, users face downtime very rarely, but in case if any case comes into picture, Company provides 24*7 phone support to their Office 365 customers.

6. New Features & Update More Regularly

Microsoft has invested more than $15 billion in cloud infrastructure, development and very big operation team of engineers who provide support across the global. So you may expect number of new updates, best features, and offers in the future.

7. Easy Administration

Easy administration is the top reason why an organization should consider Office 365. Everything is well managed in easy-to-use web based Admin Console. A clean template based dashboard allows to manage everything as your company needs.

8. High Level Security

Office 365 uses the deep tactic to provide physical, logical, and data layers of security structures and operational best practices. Additionally, Office 365 provides enterprise-grade and user & admin controls to more secure your environment.

9. All App in One Place

This is one of the biggest advantages to having Office 365 account. You can access all Windows app at on place whatever you want. Some are free – Some are paid, just add the apps on your Office 365 Home screen and access them easily. Apart from the Windows app, you can also add and access complete Microsoft Office (Word, Excel, PowerPoint etc...) and use them from anywhere.

10. No Data Loss

Office 365 also ensures that you’ll never lose the data and all your information will keep intact during all times.

So why are you waiting for?

These all points make good sense to consider Office 365. If someone isn’t seen Office 365 benefits yet, share this blog within your organization and prepare your documents accordingly for migrating to Office 365.

So if you’re planning to migrate from Exchange Server to Office 365, try Stellar Mailbox Extractor Tool. It will help you to migrate all your mailboxes to Office 365 without any failure.

Thanks,

Troubleshooting Exchange Connection Issue to Outlook

$
0
0


Connectivity problem between Microsoft Exchange and MS Outlook is a common issue by which most of the Exchange Admin frustrated all the time. But with fewer diagnostic and repair, any error can be fixed which causes to stop connectivity between Exchange and Outlook. 


So today I am sharing multiple methods to fix the Outlook connectivity problem. However, repair of your profile may also fix connection issue, but you can also try few other procedures as well to resolve it. Follow the procedures below:

Uncheck Offline Mode

This is the very thing you need to do whenever you face this issue. Verify that whether Offline Mode is unchecked or not. If you’re using Outlook 2010, Click Send/Receive tab and locate Work Offline button, just click it.
You can notice in the bottom of Outlook window Trying To connect..... , if it connects, the issue has been resolved. Else, try the next solution.

Restart Outlook

This is another very basis step to fix Exchange Outlook connectivity issue. Restart Outlook and check again, and in case if goes fail then restart computer & try again. Still if it goes wrong then move to the below solution.

Repair Install

Run Microsoft Office repair installation and check again. This quick tip may resolve the problem that standard repair can’t fix. Just navigate through the below step-

Open Control Panel -> Program -> Programs and Features. Locate Microsoft Office installation and select it. Click Change and Repair. Once repair process is completed, restart your computer. Open Outlook and try again to connect with your Exchange server. Still no luck!!? 

Now recreate Outlook profile.

Recreate Outlook Profile

If all the above solution didn’t work for you, you can recreate Outlook profile. Check here the quick reference: https://support.microsoft.com/en-us/kb/829918

However, I do not recommend you to create a profile again as you still have few alternatives to resolve the error. Just repair Outlook profile.

Repair Outlook 2016, 2013, 2010 Profile

Open your Outlook profile, and click Account Settings under File tab.
Once Account Settings dialogue box prompts, just select your current account under Email tab and click Repair. Simply follow all the steps in the repair wizard.
Once repair process is finished, close your Outlook and restart it.

Repair Outlook 2007 Profile 

Open Accounts Settings from Tools menu.
Select your account on repair tab once dialogue box prompts, and click Repair. Just go with repair wizard steps and click finished. Restart Outlook to verify that if it works. 

For Microsoft Outlook 2003 

You can repair Outlook 2003 profile if your account uses IMAP or POP for connecting to Exchange Server. You can use ScanPST.exe to repair your Outlook 2003 profile or data files.

But in case ScanPST fails to repair PST file no matter which Outlook version you’re using (Outlook 2016 to 2010), I’ll prefer you go for Stellar phoenix Outlook PST repair software to fix PST file issues. This utility is specially designed to troubleshoot PST file errors.

You can download this software by visiting the official url-http://www.stellaroutlooktools.com/scan/pst-repair.php

Repair Outlook for Mac 2011 Profile 

Outlook for Mac 2011 doesn’t provide inbuilt profile repair tool. To repair the connection made in Outlook for Mac 2011, you can only remove and re-add your account. 

Follow the steps-

First you need to remove your existing account-
·        Open Outlook for Mac 2011, and click Accounts from Tools menu.
·        Now select the account from the navigation pane which you want to remove and click the minus icon (-) from the corner on Accounts dialogue box.
·        Now confirm the prompt if you want to delete the account, and click Delete.
Now add an Exchange account-
Open Outlook for Mac 2011, and click Accounts from Tools menu.

·        If it’s a very first account which you are creating on Open Outlook for Mac 2011, click Add an account and choose Exchange account. Or if you already have an account with different email, click (+) plus icon from the corner on Accounts dialogue box to add the account. Now click Exchange.

·        Now type user ID in E mail Address Box on the ‘Enter your Exchange account information’ page. E.g. Walter@contoso.onmicrosoft.com

·        Make sure that User name and password is selected in the Method box. Now type your User ID and password.

·       Also verify that Configure automatically is selected, and then click Add account. Once you clicked Add account, Outlook for Mac 2011 automatically makes online search to discover your email server settings.

·        Once it prompts, select the check box Always use my response for this server and click Allow.

Now you can see newly created account in navigation pane of the Accounts dialogue box.

However, you can also opt for third party OLM repair tool in case the Outlook for Mac 2011 gets damaged or corrupt. The prominent OLM repair software can be downloaded over here: www.stellaroutlooktools.com/scan/olm-repair.php

So these are all possible troubleshooting steps which you can use to fix Exchange connection problem with Outlook; whether you’re using Outlook 2013/2010/2007/2003 or Outlook for Mac 2011.
Thanks,
Viewing all 133 articles
Browse latest View live