Quantcast
Channel: Exchange Server Blog
Viewing all 133 articles
Browse latest View live

What to do before repair Exchange 2010 Database

$
0
0

Troubleshooting a corrupted database in Exchange Server is not as easy as it seems. Lots of pre-check and key steps must be performed by an Exchange Administrator to fix database corruption. However Administrators have many options to handle damaged database files; either restore or repair complete database, but still there are some discrepancies Exchange admin should be aware before repair any Exchange database file.

 So there are three points as an Exchange Administrator you should follow during troubleshooting corrupted Exchange Server 2010 database file. Check it below-


1. Dismount MS Exchange Server 2010 database

Either repairing with inbuilt utility ESEUTIL or using any third party tool, it is required to verify Exchange database has been dismount before attempting to repair it. For dismount the database, simply open EMC (Exchange Management Console) and navigate to –

Organization Configuration -> Mailbox

And click on Database Management tab. Now select the database from the list and make sure that dismount is mentioned with selected database column. If it isn’t, you’ll need to dismount it.

Right click on selected database and dismount it by selecting Dismount Database command. 

2. Use ESEUTIL to repair corrupt database

Repairing a database with EXEUTIL is always a good way to go with, and simply can accessed by navigate-
C:\Program Files\Microsoft\Exchange Server\V14\Bin 

But if you’re using ESEUTIL to repair any corrupted database so possibility is higher of data lose during repairing process, because ESEUTIL rebuilt the Exchange database and erases any invalid data that it encounters during the restructure. So, it is mandatory to take the backup of database before attempting to use ESEUTIL. Also check that you have back of other important files such as Log file and Checkpoint file
.
If you’re using ESEUTIL for Exchange edb file repair, must perform integrity check on the database. Integrity check helps to measure the amount of damage in the database. You can perform either simple recovery or full database repair, Integrity Check is the best method to find out which form of process you want.
3.       Repair Exchange 2010 Database

ESECTIL can be used for repair a working database too, so make sure have backup of edb file. And also check that much free space is available during database repair process because ESEUTIL rebuilt the database and deletes any invalid data so you will need as much free space as the database is presently consuming. After successfully completed the database repair process, must perform offline database defragment by entering ESEUTIL /D “<database name>” command.  

Offline defragmentation is required to perform after database repair because defragment process physically reassembled the database and frequently re-built certain misplaced pointers.

Also run following command to start cleanup process one you have done database defragmentation –
ISINTEG –S <server name> -Fix –Test alltests

However, by running the above command you may receive few errors because this command returns few errors until all the frequently errors go away. So we recommend run this command continuously until it stop the errors. 

However, third party tools like Stellar Phoenix Mailbox Exchange Recovery is another reliable way to repair/restore Exchange 2010 database or any latest or earlier version of Microsoft Exchange Server.  

How to increase mailbox size in Exchange 2010

$
0
0

It is a common query of Exchange users about the size limit of their mailboxes. They want more space on server to store and keep their safe data from being vanished. To fulfill the requirement of Exchange users, Microsoft provides the facility to customize the storage setting to increase the size limit of Exchange mailbox. With follow few easy procedures Exchange admin can change the size of mailbox according to the user’s requirement.

So today, we will discuss the methods of increasing Exchange 2010 mailbox size limit. However there are two procedures to modify the size of mailbox in Exchange server such as by using Shell command, or by configuring storage quota in EAC (Exchange Admin Center). But before follow the below procedures, you need to assign the permissions. So first check the RecipientsPermissions, then follow the below steps. 

Increase mailbox storage quota in Exchange 2010

Firstly, we are using EAC to configure mailbox quota.

EAC (Exchange Admin Center) to configure storage quota of user mailbox:

1. Open Exchange Admin Center (EAC) and navigate to Recipients> Mailboxes.

2. A list of all the mailboxes will appear by click on Mailboxes, now you can select here the targeting mailbox that you want to change the storage quota. Select the user mailbox and click Edit to change the property of this mailbox.

3. Just click Mailbox Usage then click More Options on the property page of mailbox.

4. Now configure the following boxes by clicking on Customize the settings for this mailbox. Value can be set here from the range of 0 to 2047 GB (gigabytes).

o   Issue a warning at (GB)

This box shows the maximum storage limit of mailbox before delivered a warning message to the user. Exchange sends warning message to Exchange user once their mailbox reaches or become exceed more than value identified.

o   Prohibit send at (GB)

This box shows the forbid limit of the Exchange mailbox. Exchange sends and shows a new detailed error message to user if the limit of the mailbox has outdone to the set limit.

o   Prohibit send and receive at (GB)

This box shows the forbid send/receive limit of the mailbox. Exchange stops the mailbox from delivering or sending any new message once mailbox size limit cross the specified limit. All messages which sent to that user’s mailbox return to the sender with detailed error note.

5. Now just click Save and that’s it.

You can increase the size limit of Exchange 2010 mailbox by using EAC.

Now verify that the above configuration has been working or not. 

o   Go to EAC, navigate to Recipients> Mailboxes

o   Select the mailbox from the list to verify the storage quota, and click Edit.

o   Click Mailbox Usage then click More Options on the property page.

o   Now verify that Customize the settings for this mailbox has been selected. Just verify storage quota setting that you made.

However there is another method to customize the mailbox storage quota. Just use Shell commands to configure that.

Use Shell command to customize mailbox storage quota:

By running few lines of shell scripts you can easily customize the mailbox size in Exchange Server 2010.

Set-Mailbox -Identity "Davidson" -IssueWarningQuota 30.5gb -ProhibitSendQuota 35.75gb -ProhibitSendReceiveQuota 40gb -UseDatabaseQuotaDefaults $false

By running the above Shell command, you can set the issue warning, forbid send, and forbid send & receive quotas for Davidson's mailbox to 30.5 GB, 35.75 GB, and 40 GB individually.

Set-Mailbox -Identity "Charles" -IssueWarningQuota 800mb -ProhibitSendQuota 850mb -ProhibitSendReceiveQuota 1gb -UseDatabaseQuotaDefaults $false

By running the above Shell command, you can set the issue warning, forbid send, and forbid send & receive for Charles mailbox to 800 MB, 850 MB, and 1 GB separately, and configures the mailbox to use custom settings.

That’s it. Now run the below scripts in Shell to verify that required storage quota has been configured. Run the below command to check that.

Get-Mailbox<identity>fl IssueWarningQuota,ProhibitSendQuota,ProhibitSendReceiveQuota,UseDatabaseQuotaDefaults

Troubleshooting 'Exchange 2013 Not Receiving External/Internal Emails' Issue

$
0
0


It is a very common problem with the all versions of Exchange Server including Exchange 2013 where user doesn’t receive any email from outside as well as inside of the Exchange network. However, administrator has configured all the setting according to Exchange Server 2013 guidelines but still there is some possibility to face 'Exchange Server not receiving emails' problem. Possibly these kinds of error usually occurs due to Internal DNS related issue in Server.


So today we’re going though few easier steps to fix this email receiving problem occur with Exchange Server 2013 SP1 too.

How to Fix Internal Email Receiving Issue in Exchange

All internal transmission should work if Exchange 2013 has been installed with minimal setting. Every user should be able to receive and send emails among all the users on Exchange. But it doesn’t work always. 

If you’re also facing the same issue after configuring all the setting in Exchange 2013, check and apply below setting to fix this issue.

But before try the solution, make sure that domain local DNS IP (not 127.0.0.1) is set on NIC of Exchange Server and nslookup is working fine and resolving. Now follow the steps-

1. If you setup secondary DNS IP in the NIC of Exchange server, then delete it and restart Frontend transport service and Microsoft Exchange transport.

2. Now login Exchange Control Panel, and navigate to 'Servers'. Choose your Exchange Server and click 'Edit'. Select DNS Lookup and setup local DNS server IP on Exchange server’s DNS lookups.

3. Now add your local DNS Server IP in Internal DNS lookups from Custom Settings options.

That’s it. After manually adding above setting, internal emails flow will start to your mailbox.

Fix External Email Receiving in Exchange 2013 

You can check here incoming SMTP emails status by Microsoft Connectivity Analyzer. It will display an error which specifies outside email receiving problem in Exchange Server 2013. 

Now do the same as we applied above for internal emails. But this time, set the local DNS Server in External DNS lookups from Servers Settings option. And restart Frontend transport service and Microsoft Exchange transport.

Apart from this solution, you can also modify Host file to fix this issue. Simply open Host file of your Exchange Server and add the following host entries in the file.

10.10.10.100         mailserver
10.10.10.100         mailserver.yourdomain.com

That’s it. After applied above method or modifying Host file, it will restart Exchange transport services and start working.

Unexpectedly, if above methods didn’t work for you; check Firewall logs, transport logs, Exchange server event viewer, and Microsoft remote connectivity analyzer. You will get more hint why receiving emails problem occurring in Exchange 2013.

However, if your Exchange Server is not a newly configured server and you’re facing this issue lately; possibility is your Exchange mailbox has been corrupted. 

You may try Stellar Phoenix Mailbox Exchange Recovery tool to recover your data from Exchange server. This trusted utility supports Exchange Server 2013 along with other earlier Exchange version including 2010, 2007, and so on.

Hope, above solution worked for you.

Exchange 2010 Spam Filter Settings to Stop Junk Emails

$
0
0

With rapidly increased the number of Exchange users and its popularity, spamming problem has also increased ridiculously in last few years. Different types of spam tactics like Junk Emails, has made Exchange Administrator job questionable to justify, why and how to fix these spam problems in Exchange Server.
So today we’re sharing quick guide to enable and setup spam filter setting in Exchange Server 2010. Just check it below-

How to Enable Anti-spam Setting in Exchange Server 2010 

Anti-spam configuration setting can be enable by modify few settings in Exchange Management Console (EMC). But before setup spam setting in Exchange, close the EMC on Hub Transport server and open Exchange Management Shell. 

However, same configuration works for Exchange Server 2007 too, but Exchange 2010 has included few advanced feature to stop spam problem.

So, first you need to open Exchange Management Shell, which can be opened directly by navigating through Start -> All Programs -> Microsoft Exchange Server 2010 -> Exchange Management Shell
It will prompt like –


Now run the following power shell command in Exchange Management Shell-

Set-TransportServer -Identity 'Here comes Your Hub Transport Servers Name' -AntispamAgentsEnabled $true

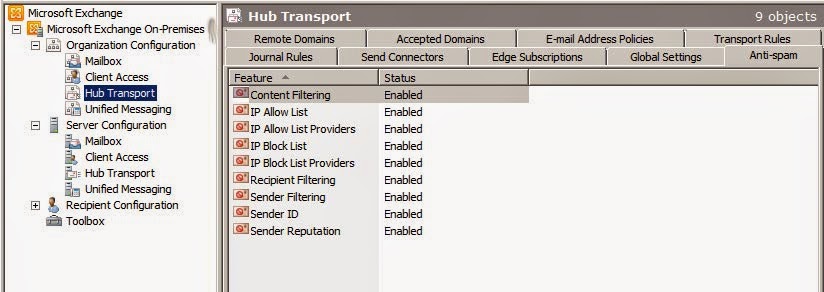
Now close the Exchange Management Shell and go back to open Exchange Management Console (EMC). Now you can notice few new tabs in Server Configuration -> Hub Transport and also in your Organization Configuration -> Hub Transport as Anti-Spam which looks as displayed below-


As you noticed above Anti-Spam feature is available there, now check Recipient Filtering is configured or not.

Open properties of Recipient Filtering to verify it was configured. But as you can see in the properties box that this feature is disabled, click the checkbox option Block messages sent to recipients that do not exist in the directory and click OK to apply the setting. This option was required to enable.  

That’s it. Now you will no longer receive emails for addresses which do not exist on your server. But this setting will no longer stop malicious users who send random emails using automated software. To stop this, you need to enable Exchange 2010 Tar Pitting functionality.

Tar Pitting functionality delays server response time by 5 second for specific SMTP communication patterns which indicate spam or high volumes of annoying junk emails.

However delay of 5 second is enough to halt spam attacks, but you can adjust Tar Pit interval on Exchange Server 2010 through the Exchange Management Shell. 

You can check current Tar Pit interval by running below Shell command-

Get-ReceiveConnector "Enter here your Connector name" | select tarpitinterval
To change interval, run below command-

Set-ReceiveConnector " Enter here your Connector name" -TarpitInterval 00:00:20

By default Exchange 2010 delays the reply sent to an email server by 5 seconds. But by running above Power shell script, it will change Tar Pit interval to 20 seconds.

However, simply run below command to disable Tar Pitting-

Set-ReceiveConnector " Enter here your Connector name" -TarpitInterval 00:00:00

So after configuring Anti-spam setting in Exchange Server 2010, you can control over annoying spam junk emails problem on Exchange 2010.

Hope it helped you.

How to restore corrupt mailbox in Exchange Server 2013

$
0
0
The Exchange administrators may come across some logical errors such as incorrect element display in folder or their incorrect quantity, which cause damage of Exchange user's mailboxes.

There may be many possible reasons for corruption in Exchange 2013 mailbox.However,these types of errors mostly occur due to malfunction on the client’s side where client incorrectly updates MAPI flags during processing of mail folders element. It has been detected that logical errors usually happen within shared mailboxes where several users might be working simultaneously.  Generally users can’t suspect errors in their mailbox or folders as everything operates correctly. But when something happen wrong, then user is unable to access certain folders and mailboxes. 

In some worst cases, emails or folders get deleted or cannot be viewed which are saved in the mailbox.In same situation, Exchange administrator should use any of the troubleshooting ways mentioned below for recovery of corrupted mailbox in Exchange 2013:

          a) Import data from Outlook: In this method you need to convert the OST file of Outlook account into PST file, then delete and create the new mailbox and lastly import data from PST file to the new mailbox. However this method results in certain level of manual manipulations on user’s PC. 

       b) By disabling of mailbox store: In this method, you need to disable the mailbox store fully and check it with Isinteg.exe utility, which allows repair the damages in Exchange base on application level. But this method requires a halt on service time for all users whose mailbox is allocated in disabled mailbox database.

      c) Using backup to restore Exchange database:In this manual method, you need to import data from mailbox to PST file and further transfer data to mailbox. But one disadvantage is that all emails which delivered to user’s mailbox after last backup execution time can be lost.

To provide a more convenient way to restore damaged mailbox logical structure, a new Powershell cmdlet New-MailboxRepairRequest which allows finding and fixing all logical error in Exchange database.
 Moreover the error correction and search can be customized as per need. You can select any specific or all mailboxes for restore regularly. There is no need to put all mailboxes in off-line mode. But before performing any above method to restore mailbox integrity, you should definitely try to use this command.

Command 1:
New-MailboxRepairRequest -Mailbox sample@domain.com -CorruptionTypeFolderView
This command detects and repairs all folder views for the mailbox sample@domain.com.

Command 2:
New-MailboxRepairRequest-Mailbox peter-CorruptionTypeProvisionedFolder,SearchFolder -DetectOnly
This command detects and reports on ProvisionedFolder and SearchFolder corruption issues to Peter Smith’s mailbox.


And there are many more cmdlet to restore damage at different level. But if you still face difficulty to fix mailbox damage, then use a trusted third party tool to restore damaged mailbox easily and successfully. Use Stellar Phoenix Mailbox Exchange Recovery tool that effectively repairs damaged EDB files having mailbox to individual PST file. Try out this tool, it’s really worth.

10 Features of Microsoft Exchange Server 2013

$
0
0
Email is one of the most important mediums in today’s business world. So initially it is very necessary to have an idea about what email systems are and what they do.By far the most prominent leader of the email industry is Exchange server. Exchange Server 2013 is the most upgraded version, equipped with advance features. It comes with two different versions- 

  •   On Premise version: Supposing a server which is located very nearby you.  
  •   Off Premise version: This version is also known as ‘Cloud’ version in which server is supposed to be ‘Hosted’ by another company. 
So with this Exchange blog, we’ll discuss about the features/benefits of Exchange Server 2013, and will describe how Exchange 2013 can help you to manage email messaging system in small to big organizations.

Let’s have a look at the top 10 benefits of using Microsoft Exchange Server 2013, and know how it is going to benefit you or your business. Here it is-

1) Protect sensitive data through DLP (Data Loss Prevention):This feature of Exchange Server 2013 provides identity, monitor and protect sensitive data through deep content analysis. In addition to this, Exchange 2013 also offers certain regulatory standards such as PII and PCI which provides extensible support to other policies important to your business.

2)  Integration of new In-Place eDiscovery: Exchange Server 2103 lets you to stop employees from deleting emails that could be important to a particular case. The eDiscovery center allows administrator to search data in Exchange from one place which helps in identifying, hold and analyzing the emails.

3)   Keep all your important data in archiving and primary mailbox: The Exchange Server 2013 empowers users with an in-place archiving and the facility to retain large mailboxes in primary mailbox. The Exchange Server 2013 is blended with the powerful and flexible retention policies which offer complete control of storage to keep Exchange users productive.

4)   Enable users to be more collaborative: Exchange Server 2013 makes it easier for users to manage teams and project communications easily and quickly as it allows users to see old communication on a project and give access to current versions for their team document.

5)   Protection against email threats: Exchange actively protects your communications with built-in utilities providing defense against email threats. It has multi-layered anti-spam filters comes with regular updates to provide safeguard against virus and spam threats.

6)  Gives a portability and touch-enabled inbox experience:  Now you can easily enable Exchange users to access their emails from anywhere with clean and uncluttered experience. The same thoughtful design in the Outlook desktop interface has been applied to both the browser and mobile interfaces.

7)    Move to Cloud with flexible options including Exchange hybrid: The Exchange Server 2013 provides users an unbroken experience including scheduling meetings and sharing calendars between online and on-premises users and doing this will slightly interruption as possible. You'll be still remain in control during testing the cloud's newest enhancements with support for upgrade previews.

8)    Decrease the amount of time spent in managing systems: With the introduction of EAC (Exchange Administrative Centre), it becomes very easier to manage powerful capabilities including DLP, site mailboxes, and apps for Outlook. With collaboration of RBAC (Role Based Access Control) in Exchange server, you can offer your help desk and expert users with the tools to execute exact tasks without requiring full administrative authorizations.
  
9)    Customize Exchange Server by integrating relevant apps:  Exchange Server 2013 version provides users to make their communication experience more powerful by reducing the time spent in switching between apps.

10)   Bring all contacts together at one place:  Now you can easily bring your all-important contacts at one place, and can also bring your other networks contacts as well at same place. Exchange server will find the contact information of same user across networks and consolidate their information into one contact card without any duplicacy.

How to manually remove Exchange Server Log Files

$
0
0
It is well known that Exchange Server transaction logs keeps the full record of the performed changes in the Exchange Server database, and these log files should be periodically removed from the hard disk because these log files gather or acquire all the available free disk space.

Usually, the size of Exchange transaction log file is fixed, exact 5MB, for MS Exchange Server 2003 and all earlier versions. If the particular transaction log is full, it is renamed with a numeric sequence number and a new current log is generated. Here the current transaction log is the most recently created by Exchange Server.

These transaction logs are being called from different names corresponding to MS Exchange version. For example, In MS Exchange Server version 5.5, the current transaction log file is called Edb.log and for Exchange Server version 2000 and 2003, the current log is named with the Storage group prefix.

There are some in-built methods in Exchange which removes the unnecessary log files automatically which are as follows: 

When circular logging is enabled: This method removes transaction logs after they have been removed written to the database group.
When circular logging is disabled: This method removes excess logs after a complete or full online backup of all the databases in a storage group is performed. 

However, sometimes you have to manually remove the transaction log files when you anticipate running out of hard disk. If removing a log which holds data that hasn't been written on Exchange database file, then database databases will no longer be mountable after an abnormal stop.

In order to remove the transaction log files manually, there are certain prerequisites that you need to accomplish before remove Exchange Server transaction log files-

a    a)  Database states: Before the manual removal of any transaction log files, you should determine the state of the particular database which you are using. There are two states possible one is ‘attach’ which means that Exchange Server database has not been shut down correctly, and another is ‘detach’ means the database is shut down correctly.  The state of the database can be determined by using Eseutil utility’s/ MH command switch.

     b) Storage groups: Before you begin the manual removal of Exchange transaction log file, initially you should verify that each database is in a Clean Shutdown (Consistent) state. In Storage groups, Exchange Server databases are organized where these databases share a single transaction log file stream.

Below is a complete set of steps to remove the excess transition log files manually:

1    1)    Give a halt to the entire databases in the storage group.
2   2)    Now the verification of the state of each database in the particular storage group is done.
3    3)    Execute one of the following actions:
·   If one or more of the databases are found in the Inconsistent (Dirty Shutdown) state, analyze which transaction log files can be removed without affecting consistency
·  If all the databases are found in the Consistent (Clean Shutdown)state then you can remove the entire transaction log files except the current one.
4   4)  Now at last, copy all the transaction which you want to remove to a different location before removing them permanently from the transaction log hard disk.

So this is the most simple and secure method to remove the excessive Exchange Server transaction log files manually, it is highly recommended.

Fix ‘This mailbox database contains one or more mailboxes’ Error in Exchange 2013

$
0
0
Several times when you attempt to remove a database from an MS Exchange Server 2013 mailbox, you may come across the following error:

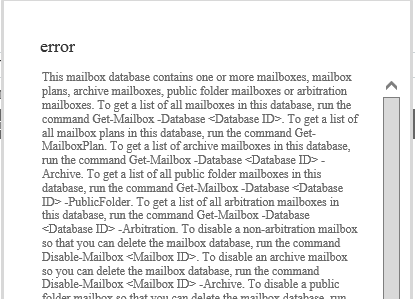
 “This mailbox database contains one or more mailboxes, mailbox plans, archive mailboxes, public folder mailboxes or arbitration mailboxes.”

You may note here this error occurs even on a brand new mailbox database which you have not migrated any mailboxes to or created new mailboxes on is susceptible to this type of error. 

Below is the snapshot of this error:


This error message provides the following details: 

      a)    Root cause- It is due to the mailboxes that still exist on the database.
      b)    Resolution - It is achieved by removing the mailboxes.

Now, let’s take a glance at each of the mailboxes types and the required strategy to move or remove them.

     a) MAILBOX USERS– For normal mailbox users, you need to runthe following command New- MoveRequest and wait for the moves to complete. In this way mailbox users can be moved to another database.

E.g.To move the mailboxes from ‘Mailbox Database A’ to ‘Mailbox Database B’ the following command is executed.

[PS] C:\>Get-Mailbox -Database "Mailbox Database A" | New-MoveRequest -TargetDatabase "Mailbox Database B"

       b)  ARCHIVE MAILBOXES – In these type of mailboxes, the default command provided(for removal) in the error message does not actually work. So instead of this, you can run the following command to identify mailboxes with the ArchiveDatabase attribute matching the database that you are trying to remove.

[PS] C:\>Get-Mailbox | Where ArchiveDatabase -eq "Mailbox Database P"
Name                  Alias                ServerName           ProhibitSendQuota
 ----                     ----                    ----------                   --------------
Mark.Luther       Mark.Luther        e15mb1                      Unlimited
Denis.Lilly           Denis.Lilly           e15mb1                      Unlimited

To move these archive mailboxes, you need to execute the following New- MoveRequest command again.
 
[PS] C:\>Get-Mailbox | Where ArchiveDatabase -eq "Mailbox Database P | New-MoveRequest -ArchiveOnly -ArchiveTargetDatabase "Mailbox Database Q"

       c)  ARBITRATION MAILBOXES– In Exchange Server 2013, this type of mailboxes serve many purposes but generally they prevent the removal of the database on which they exist in.

To view the arbitration mailboxes execute the Get-Mailbox command as follows:

[PS] C:\>Get-Mailbox -Database "Mailbox Database M"–Arbitration

Now, arbitration mailboxes can be moved to another database similar to any other mailbox move request.

[PS] C:\>Get-Mailbox -Database "Mailbox Database M" -Arbitration | New-MoveRequest -TargetDatabase "Mailbox Database N"

4    d)  PUBLIC FOLDER MAILBOXES - There is a special folder named ‘public folder mailboxes’ in    Exchange Server 2013 where public folder data is stored.

To check a database for public folder mailboxes run the following command:
[PS] C:\>get-mailbox -Database "Mailbox Database P"–PublicFolder

Now these public folders can be moved by executing the following command:
[PS] C:\>Get-Mailbox -Database "Mailbox Database P" -PublicFolder | New-MoveRequest -TargetDatabase "Mailbox Database Q"

FINALLY REMOVING THE EXCHANGE SERVER 2013 DATABASE – After the removal of all mailboxes types from the database, you can finally proceed to remove the database itself.
Now navigate to Exchange Admin Center (EMC)-> Servers ->Databases, select the database which you want to delete, and click the trash icon.

So make sure that you have carefully identified and removed all the mailboxes because this will ensure the successful removal of Exchange 2013 database. 

Performing Single Item Recovery in Exchange Server 2010

$
0
0


Restoring single item from Exchange 2010 is not an easy task if user had deleted that item accidently, even becomes more critical if you don’t have any reliable tool and you have to restore single item manually! However you can recover whole mailbox data for recovery of a single item, but this process might be time consuming too; and it is also not the right way to restore just a single mailbox item. 

So avoid the limitation of one specific item recovery, Microsoft brings Single item recovery in Exchange server 2010 which simplifies recovery of a single item without restoring entire mailbox or mailbox database.
So today we will illuminate methods to search and recover missing item, and also suggest you the best tool to easily recover any item individually from Exchange 2010 mailbox without using Power shell commands.

But before start the manual method, you need to know the following-

  • This process may take 15-30 minutes. 
  •  You need to provide specificpermission. 
  •  Verify that single item recovery must be enabled for a mailbox before the item you need to recover is removed.   
  •  To search and recover missing item, you have the following info-
1.       Source Mailbox: The mailbox which is being searched.
2.       Target Mailbox: It is the discovery mailbox where missing item will be recovered. However Exchange setup creates a mailbox by-default but if you want to create extra discovery mailbox, you can also createa discovery mailbox.
3.       Search Criteria: It contains sender or recipient, or phrases/keywords in the message.

Now follow the below steps-

Search and recover missing item:

Run the following shell command to search user mailbox and copy item to discovery mailbox.
Here we take an example where we searched for items in May Stewart's mailbox that meets the following criteria:
·         Sender : Alexander
·         Keyword : Colombia

Search-Mailbox "May Stewart" -SearchQuery "from:'Alexander' AND Colombia" -TargetMailbox "Discovery Search Mailbox" -TargetFolder "May Stewart Recovery" -LogLevel Full

If you want to verify above shell command worked or not, log on to the discovery mailbox which you selected as the target mailbox and review the search command outcomes.

Restore Recovered Items:

You can restore the item to user’s mailbox once it has been recovered to discovery mailbox.

Run the below cmdlet to restore items to May Stewart's mailbox and deletes it from Discovery search mailbox.

Search-Mailbox "Discovery Search Mailbox" -SearchQuery "from:'Alexander' AND Colombia" -TargetMailbox "May Stewart" -TargetFolder "Recovered Messages" -LogLevel Full –DeleteContent

Again, you can check recovered item in target folder to verify that above command has successfully recovered messing item.

Use Shell command to Export & Import Items from PST:

Now export content from mailbox to PST file and again import content of PST file to a mailbox.

Run following command to export item from May Stewart's Recovery in the Discovery Search Mailbox to PST file.

New-MailboxExportRequest -Mailbox "Discovery Search Mailbox" -SourceRootFolder "May Stewart Recovery" -ContentFilter {Subject -eq "May travel plans"} -FilePath \\MYSERVER\HelpDeskPst\MayStewartRecovery.pst

Now import messages from a PST file to the folder Recovered by Helpdesk in May Stewart's mailbox.
New-MailboxImportRequest -Mailbox "May Stewart" -TargetRootFolder "Recovered By Helpdesk" -FilePath \\MYSERVER\HelpDeskPst\MayStewartRecovery.pst

Mailbox Item Recovery with Third Party Tool

Of course above solution is bit complex to recover a single item. So I suggest you to use a prominent third party tool to perform single item recovery on the basis of 'To', 'Subject', 'From', 'Cc', 'Attachment Name', 'Body', 'Item Type' etc. with fewer clicks. 

Try Stellar Phoenix Mailbox Exchange Recovery Software. It comes with demo version, so you can see how it works and how helpful to recover any item from Exchange server 2010. This utility is also worth to buy as it support to latest version Exchange 2013 too!

So my personal recommendation is, give it a try. It really works!

Hope, you found above solution helpful.

Restoring Exchange 2010 Mailbox Database to Recovery Database using DPM

$
0
0


Today we’re sharing one of the most common procedures to restore mailbox database in Exchange 2010. This most performed method is used in Data Protection Manager (DPM) is to a recovery database. Before follow the procedure, check that database status is active or passive. Below method (using DPM) can't perform a VSS (Volume Shadow Copy Service) recovery if database status is passive, it only perform on active status database.

Recovery to active database is as same as recovery to Exchange 2010 individual node. You must synchronize the passive copy from the recovered active copy by running the Resume-MailboxDatabaseCopy Powershell command on server.
Restore Exchange Mailboxes...

Restoring edb is the first process in this topic, then restoring Exchange user’s mailbox. Now follow the steps-

Step 1: Create Exchange Recovery Database (RDB)

First, create an Exchange RDB (recovery database) for restore target database. To do so

 I.    Open Exchange Management Console (EMC) on Exchange Server 2010.
  II.   Run the below command once you connected with,


New-MailboxDatabase -Recovery -Name %RDBName% -Server %ExchangeServerName%

Where RDBName is recover database and ExchangeServerName is the Exchange Server name where recovery database will be created.

However you can specify the location of RDB by running the below command-

New-MailboxDatabase -Recovery -Name %RDBName% -Server %ExchangeServerName% -EdbFilePath %targetDBPath% -logFolderPath %targetlogPath%

Now run the below command to make sure mailbox database has been created. By running this shell command, it will show the list of all mailbox databases on your Exchange Server.

Get-MailboxDatabase


Now open EMC and navigate to Organization Configuration > Mailbox, or refresh if you already open EMC. By navigating through, it will show by default the RDB is dismounted and is set to allow to be overwritten.


Open properties box of RDB by right click, it will prompt here status as ‘Dismounted’ and maintenance tab. Now verify that “This database can be overwritten by a restore” option is checked.

But there are some limitations with Recovery Database (RDB) which may cause issue for restoring from DPM. And these limitations are:
  •  Exchange 2010 only supports single RDB mounted at a while. 
  •  Recovery Database can’t be used to recover public folder data. 
  •  Recovery Database also can’t be used as backup operations. 
  •  Check here more limitations of Recovery Database over Mailbox Database.
Step 2: Restore through Data Protection Manager (DPM) Console

Once you confirm that recovery mailbox database has been created, open DPM Console and click Recovery tab.

Now find the mailbox database with corresponding user’s mailbox which you want to recover, and then find the user. Select user and Click Recover.

A Recovery Wizard will prompt and click next to follow the steps. Confirm here date/time and user mailbox for the recovered item and click Next.

Choose Select recovery type andchoose one from these three items:

I.Recover mailbox to an Exchange server database:

Select this option when you’re restoring to an Exchange server where a recovery database mailbox has been setup.

II. Copy to a network folder:

By selecting this option log files and database will be available to Administrator for advance recovery.

III. Copy to tape:

You can choose this option if you want to move file to another location for recovery. But in case if there is no libraries/ tape drive, this option will be disabled.


In our case, we choose very first option. Now click Next.

A Specify Destination wizard will prompt, enter here your Exchange Server and Database name. Click Next.

On Specify Recovery Options page, select to mount the database after it’s recovered among further settings. Now verify the selection and click Next.

Review you selection on Summary page to make sure you select everything correct.

Once restore process completed on DPM Server, run below shell command to restore mailbox-

restore-Mailbox –Identity %Username% -RecoveryDatabase %RDBName%

Where username is the email Username of the user mailbox which is being recovered and RDBName is recovery database name.

That’s it. However as you can see above solution looks bit difficult to restore a mailbox database from Exchange Server 2010, so in case if database restoring procedure looks hard; you can use a totally worth third party recovery tool to restore mailboxes from Exchange. You can download the demo version of this prominent utility at Stellarservertools software download page. And don’t forget to check the complete version of this software if it helped you in demo version.   

How to Manually Uninstall Exchange 2010 : Step by Step

$
0
0


We have seen some worst cases where uninstallation of Exchange Server was the only step to make it accessible again. Depending upon the types of damages on server, it is hard to say every uninstallation process works in each scenario. 


So today we’re sharing the number of different ways to completely remove and uninstall Exchange Server 2010 from severe disk corruption or something else. 

But before trying to manually uninstallation, attempt to remove by easy method. Simply open Control Panel, click Uninstall a program, select Microsoft Exchange 2010 from the list, and click Uninstall.

Check network before uninstallation of Exchange 2010

This is very first thing you need to do before uninstalling Exchange. Verify that DNS (Domain Name System) server has a host record for Exchange Server and host record points to correct IP address. Because we have seen in most cases where majority of issues are correlated with AD (Active Directory) when we try to uninstall Exchange. So Exchange server would not uninstall if server is having communication issue with Active Directory. Once you verified the Domain Name System, check that basic network connectivity is functioning appropriately.

Rebuilt server before uninstallation

One cannot just format Exchange Server because all the configuration information is kept on Active Directory (AD). So before uninstall Exchange server, use the information stored in Active Directory to return Exchange server to function state. Check the following steps:

1. Run service pack Exchange installation CD/DVD, and run Setup /M:RecoverServer command.
2. Now format the server and install same Windows with same edition & service pack which you had installed earlier.
3. Open Active Directory Users and Computers console,Select computer account and right click to choose Reset Account. But don’t delete computer account.
4. Now enter server original name and IP address and join the domain. Again use Exchange 2010 installation disk and deploy Exchange server. However, you can also run Setup /M:RecoverServer command.

Now you can remove Exchange from server’s Control Panel.

Uninstalling Exchange 2010 

The procedure which we have discussed above only works if AD (Active Directory) is working properly because removing Exchange using this method will not be possible if corruption exists in Active Directory. In this scenario, you should manually control Active Directory. So if you’re not able to manipulate Active Directory, avoid above method as it may cause irreparable damage to Active Directory.  

Alternately, you can use ADSIEdit. Simply enter ADSIEdit command to launch the console. Once console has open, right click on ADSIEdit and choose Connect To command. Click OK to accept the default setting and it will connect you to AD. 

Now you can remove all types of situations to a specific Exchange server depends on problem you’re facing, effectively removing that server from Active Directory.

Moreover, ADSI related solutions are accessible online so also check those fixes if having issues and need of ADSIEdit.

So whether you use ADSIEdit or any other method, your final goal is easily uninstallation of Exchange Server 2010.

Troubleshooting Exchange Connection Issue to Outlook

$
0
0


Connection problem between Microsoft Exchange online mailbox and MS Outlook is a very usual issue which come up for an Exchange Admin. With fewer diagnostic and repair, any error can be troubleshoot which causes to stop connection to Exchange account in Outlook. 
So today I am sharing few easy to follow Exchange & Outlook troubleshooting tips to repair Exchange server account to MS Outlook. However, repair of your profile may also fix connection problem usually. Follow the procedures below:

Repair Outlook 2010 or your Outlook 2013 Profile -

Open your Outlook profile, and click Account Settings under File tab.

Once Account Settings dialogue box prompts, just select your current account under Email tab and click Repair. Simply follow all the steps in the repair wizard.

Once repair process is finished, close your Outlook and restart it.

Repair Outlook 2007 Profile –

Open Accounts Settings from Tools menu.

Select your account on repair tab once dialogue box prompts, and click Repair. Just go with repair wizard steps and click finished. Restart Outlook to verify that if it works. 

For Microsoft Outlook 2003 –

You can only repair Outlook 2003 profile if your account uses MAPI for connect to Exchange Server. Outlook doesn’t connect to Exchange online by MAPI. So you can use scanpst.exe to repair your Outlook 2003 profile or data files.
Repair Outlook for Mac 2011 Profile –

Outlook for Mac 2011 doesn’t provide profile repair tool. So, to repair the connection made in Outlook for Mac 2011 you can only remove and re-add your account. Follow the steps-

First you need to remove your existing account-

·         Open Outlook for Mac 2011, and click Accounts from Tools menu.

·        Now select the account from the navigation pane which you want to remove and click the minus icon (-) from the corner on Accounts dialogue box.

·         Now confirm the prompt if you want to delete the account, and click Delete.

Now add an Exchange account-

Open Outlook for Mac 2011, and click Accounts from Tools menu.

·         If it’s a very first account which you are creating on Open Outlook for Mac 2011, click Add an account and choose Exchange account. Or if you already have an account with different email, click (+) plus icon from the corner on Accounts dialogue box to add the account. Now click Exchange.

·      Now type user ID in E mail Address Box on the ‘Enter your Exchange account information’ page. E.g. Walter@contoso.onmicrosoft.com

·       Make sure that User name and password is selected in the Method box. Now type your User ID and password.

·         Also verify that Configure automatically is selected, and then click Add account. Once you clicked Add account, Outlook for Mac 2011 automatically makes online search to discover your email server settings.

·         Once it prompts, select the check box Always use my response for this server and click Allow.

Now you can see newly created account in navigation pane of the Accounts dialogue box.

So these are all possible troubleshooting steps which you can use to fix Exchange connection problem with Outlook; whether you’re using Outlook 2013/2010/2007/2003 or Outlook for Mac 2011.

How to Fix ‘Error A0010006:GRE_ERR_FAILEDTOGETEDBDETAILS’ in Exchange Server

$
0
0
Microsoft Exchange and Outlook are two very significant components needed for most secure and comprehensive online communication. Every time, when an email is sent through MS Outlook, an exact replica of that email generally get saved on Exchange Server database file (.EDB files). Moreover, all sorts of the information are saved in EDB files in such as ‘To’, ‘Cc’, ‘Bcc’ including calendar, contacts, notes, journal etc.

But sometime, a single virus infected email may spread to user’s entire mailbox and can damage the whole Exchange EDB file. In the situation, all the valuable and precious data stored in EDB filesbecomes in-accessible or may be corrupt which cause data loss.

So during such a terrible situation, you may encounter the following error:

Unable to read the EDB file data… Error A0010006:GRE_ERR_FAILEDTOGETEDBDETAILS

Cause: Severe corruption in EDB files due to virus infected email.

Solution: To fix this error effectively, Microsoft has provided a utility called ExMerge.exe to handle these types of random Exchange errors. ExMerge.exe can be used for variety of purposes like backing up the mailbox data, migration of mailboxes from one location to another, and data extraction from virus infected Exchange mailbox. One good feature of the ExMerge.exe utility is its capability to copy the mailbox data in PST (Personal Storage File) file format. It even allows you to extract the particular message from the mailbox to store in PST file format.

With the help of ExMerge tool, you can not only extract data from virus-infected Exchange mailbox, but at the same time you can conduct EDB file repair operation by the execution of below mentioned steps:

  1. Initially you need to setup ExMerge tool and run ExMerge Wizard.
  2. Now navigate to Procedure Selection page and select Extract or Import, and then   click Next.
  3.  Now visit to Two Step Procedure page, and again execute step 1 after click Next.
  4.  On the Source Server page, you need to make necessary selection of Options then visit User messages  and Folder on Data tab in Data Selection Criteria Page.  
  5. Backup the emails in PST file format so you can easily import them to desired mailbox.

However, this method performs the desired operation in almost all situations but sometime it might be fail to fetch data from damaged EDB files.

So you need a reliable third party utility to overcome from this stuck condition if the above solution didn’t work. Try Stellar Phoenix Mailbox Exchange Recovery tool to repair the heavily corrupt EDB files and extracts & save the data to a desired safe location.


Stellar Phoenix Mailbox Exchange Recovery is one such third party software that performs the task of repairing damaged EDB files. Now these repaired EDB files are safely converted to usable PST file. One of the most advance features is the ability to export the recovered mailbox to Live Exchange Mailbox. Moreover, this software is supportive to almost all versions of MS Exchange Server and MS Outlook.

How to Open Exchange Log File Using Routing Log Viewer

$
0
0


Transaction log files play a very vital role in Exchange Server as it contains the records of all the changes that were made on Exchange server database. Any changes that were made to an Exchange database is first written on transaction log file later to an Exchange database. So it’s the liability of an Exchange Administrator to keep checking the records in log file and ensuring that Exchange server is running fine without any error or failure. 

So today I am sharing with you the easiest way to open and check transaction log file in Microsoft Exchange, and quick procedure to change credentials to browse through files on a remote Exchange server. Let’s check it-

Use Routing Log Viewer to open Log File

You can open a transaction log file in Exchange server using Routing Log Viewer. However, Routing Log Viewer will not show any log file when you open it first time. You need to browse the file on local server or you can identify the name of a transport server. You can define substitute credentials with which to access the remote routing table logs.

To open a log file, assign the transportpermissions before follow the procedure-

Step 1: Open EMC (Exchange Management Console), and open Open Tool by navigating through Toolbox -> Routing Log Viewer

Step 2: Once Routing Log Viewer appears, open File and click Open log file.

Step 3: Now enter the transport server name in Name of transport server or open Browse server files option and select the preferred server which you want to use, then click Open.

Step 4: If you want tobrowsethrough the local server’s log file, leave server name blank on Exchange Hub Transport Server. Or select the file from Browse local files and click Open.

Step 5: In case if you’re browsing file on remote server, you will have to provide the administrative permissions to access remote server. Click Run As for remote browsing on remote server.

Now fill the following boxes and click OK:

  •          Use Run As for remote browsing: It is already selected by default. 
  •          User Name: Enter alternate username. 
  •          Domain: Enter domain of alternate username. 
  •          Password: Enter the password.

If you leave all the above fields empty, Routing Log Viewer will use local user’s credentials.

 Change credentials to browse on Remote Server using Routing Log Viewer

Again you need to assign the same permission as you applied in above procedure. Then,

Step 1: Open Open Tool by navigating through EMC (Exchange Management Console) -> Toolbox -> Routing Log Viewer

Step 2: Click Run As from Setting menu from Routing Log Viewer, orselect Open log file from File menu.

Step 3: Select Run As from Open Routing Table Log File. Now fill the following boxes and click OK:

  •        Use Run As for remote browsing: However, this option is selected here default. But if it isn't, click the checkbox to use alternative credentials as your created when browsing through logs on remote computers. 
  •          User Name: Enter alternate username. 
  •          Domain: Enter domain of alternate username. 
  •          Password: Enter the password.

You would require local administrative permissions on remote server to access the log file directory. That's why you would want to change credentials to browse through files on remote servers.

Fix 0x80040115 Mapi_e_network_Error during Exporting Mailbox to PST

$
0
0


If you’re exporting a large size mailbox to PST in Exchange Server 2010, probably you may get 0x80040115 Mapi_e_network_error during exporting a mailbox data to PST file. Of-course, exporting user’s mailbox data in a PST file is a very regular task in Exchange environment but if you’re exporting large sizes (5 GB+) mailboxes using New-MailboxExportRequest shell command; mailbox exporting process may be hang and then fail without completing the process.

So today I’m going through few simple ways to resolve 0x80040115 Mapi_e_network_Error, and discussing the causes with their solution whenever you receive this error during export a large Exchange 2010(SP1) mailbox to PST file. But before start the procedure, let’s talk about this error first…

The error code 0x80040115 translates to Mapi_e_network_error, usually specifies problem with connection to any of the stores involved in the mailbox exporting process. 

Causes of 0x80040115 Mapi_e_network_error

Case 1: The 0x80040115 Mapi_e_network_error message code may be occurred by corrupt windows system files as damaged system files entries might be the actual threat of your computer. There can be many events such as improper shutdown, incomplete installation or uninstallation, improper deletion of hardware or programs, or also a spyware/virus/adware attack on your computer which may have resulted in the system files errors.

Case 2: Another case, it was suspicion that connection to the PST was the issue as PST file was accessed across the network. PST was shared on Windows 7 workstation where EMS (Exchange Management Shell) was being used to run the Power Shell scripts. So the main question arises here, why do we need PST to be on same system where export process is also running? The simple answer, we don't need to go over the network during the export process.

Troubleshooting MAPI_E_NETWORK_ERROR (0x80040115)

Fix for Case 1:

·         Log on your computer as Administrator account and open System Restore option.
·         Just restore your computer to an earlier time restore point.
·         Once it’s done, restart your computer.
However, it has been detected the mailbox exporting problem might be fixed very rarely by applying this technique. But you can perform this process as initially troubleshooting step.

Fix for Case 2:  

·         Create a folder/share on CAS server 1 and provide the Exchange Trusted Subsystem Read/Write access to the share as described here.

·         In command, you need to specify new share as our file path and also specify CAS 1 MRSServer setting in your New-MailboxExportRequest command (i.e. New-MailboxExportRequest -Mailbox user1 -FilePath “\\CAS1\PSTFileShare\userA.pst” -MRSServer CAS1.domain.com).

By executing above solution, transfer rate will increase much higher than last time when you exported mailbox on Exchange 2010. So if you’re planning to export big size user mailbox data to PST file using this method, it will complete the larger size mailbox export process within few hours without any failure. 

That’s it. However, solution 2 is bit tough to implement until you haven’t good knowledge of Exchange Power Shell scripting. So only execute that method if you can control the process till the last of the completion. Otherwise, there is a widely used Exchange mailbox export tool 'Stellar EDB to PST Converter' which you can download here to export any size of Exchange EDB file or mailbox to Outlook PST file to any desire location on your computer.

Hope, it works…

Microsoft rerelease it’s Exchange Server 2010 SP3 update RU8

$
0
0
Few weeks back, Microsoft rereleased its update Rollup 8 in order to fix the issues which had found in the earlier version. This former update version has a problem associated with ‘the ability of Outlook to connect to Exchange’ for those who are using Exchange Server 2010 SP3.

Update 12-12-2014: MS Exchange Server 2010 SP3 Update Rollup 8 has been re-released to resolve an issue found in the initial release. The issue was in isolation from MAPI RPC layer and was immediately corrected to deliver the updated RU8 package. This updated RU8 v2 package is version number 14.03.0224.002.

Organizations which have already applied Updated Rollup 8; Microsoft advices them to roll back that update. This update addresses the following issues:

a)      Issues which are reported by some of the customers.
b)      Some of the security updates which are released previously.
c)       In addition, it also corrects the security issue MS14-075-this security update resolves four privately reported vulnerabilities in MS Exchange Server.

Moreover, Microsoft had also advised to organizations this updates should only be applied when the organizations had experienced the particular issue being solved.

Wide range of issues are being fixed in Update Rollup 8 which are ranging from making a correction in Russian time zone information to resolving a problem with journaling in protected voice mail. Also, MS14-075 which is a December security bulletin fix for a potential elevation of privilege issue is also included.

Microsoft also adds an important note with Update Rollup 8 that summarizes as the ‘other Exchange Server updates remain valid and customers can continue with deployment of these packages’.

It can be understood that IT professionals are little off the track. Lately Microsoft's Exchange patches seems to come with snags, at least for early deployers. However, MS announcements also advice to hybrid users. or those organization that uses Exchange Online cloud-based service along with premises based Exchange Server products. That Exchange users are 'required to deploy the most current Cumulative Update release' .

 For organizations using MS Exchange Server 2013, Microsoft had made a special announcement for them. It specified that Cumulative Update 7 should be applied ‘as soon as possible’ and the IT professional should subsequently complete a full back up after adding an update. The reason is that Cumulative Update 7 is designed to improve the backup process of Exchange Server itself. Microsoft’s statement noted that the update will ‘remove potential challenges that were faced in restoring a previously backed up database’. 


Steps to Migrate from Exchange 2007 to Office 365

$
0
0
Microsoft has made Exchange administrator’s job easier to execute migration between Servers. With an official online guide (Exchange Server Deployment Assistant), one can choose required options and practice the migration steps to understand how easily an Exchange administrator can migrate Exchange Server 2007 to Exchange Online.

So today I’m sharing Exchange server migration procedure for those administrators/users who’re planning to move towards Cloud servers from Exchange 2007.  

I’ll also start the migration process using Exchange Server Deployment Assistant in this blog, so you only need to follow the step-by-step migration process for upgrading to Office 365. Have a look-


Migration Process of Exchange 2007 to Office 365

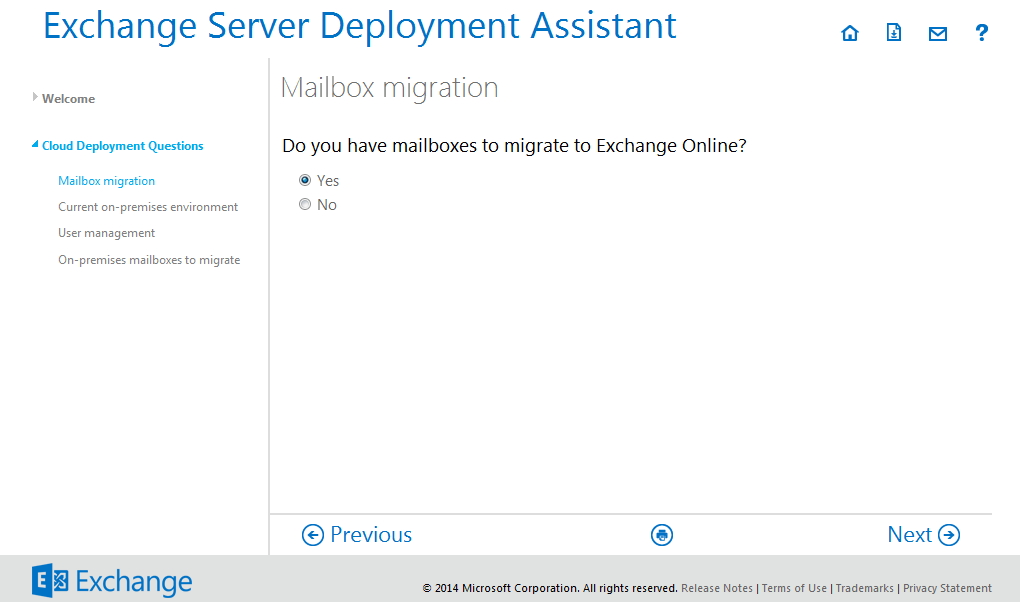
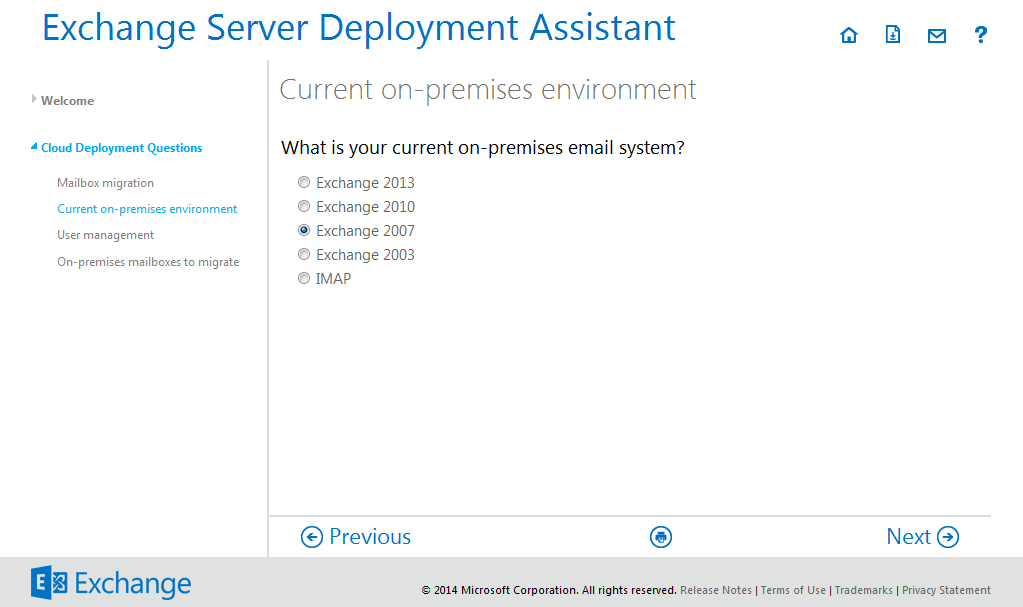
Firstly, Launch Exchange Server Deployment Assistant by clicking here and select Cloud Only option.


Select Yes as you’re migrating to Office 365 (Exchange Online), and click Next.


Now select your on-premise Exchange version form the list. Choose Exchange 2007 in your instance and click Next.


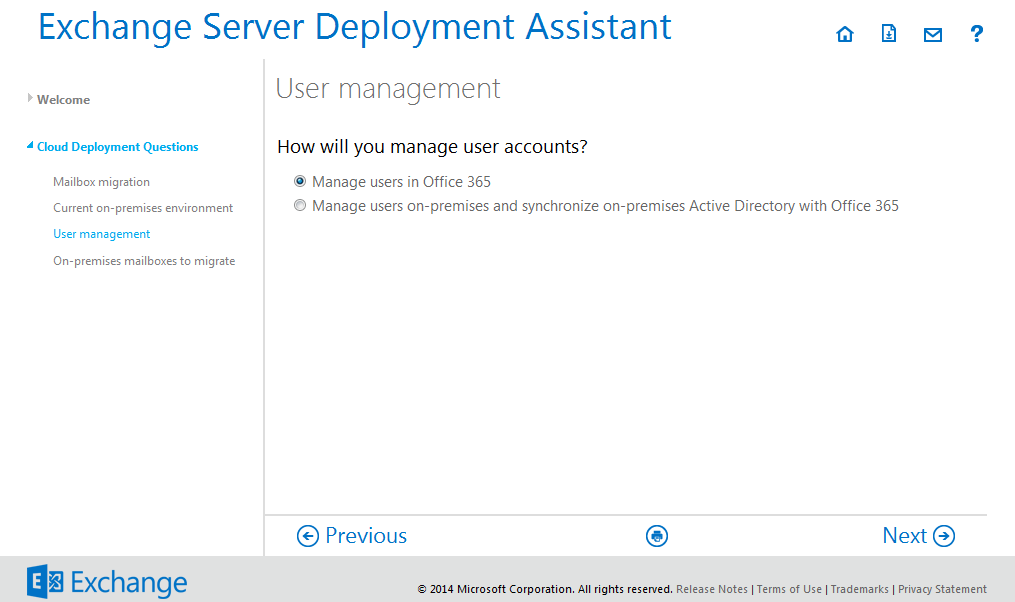
There are two options to choose from, you can choose anyone as per your system requirement. However, default option Manage users in Office 365 is already selected. Click Next if you want to choose default selection.


Now provide the information about the number of mailboxes you currently hold on your Exchange Server, and then click Next.


A guide about Migrate all mailboxes to Exchange Onlinewillprompt on your screen.


Just read the complete migration procedure and move further steps for migrating Exchange 2007 Server.

Test the current Setup

Open Microsoft Remote Connectivity Analyzer to ensure that your Exchange Server 2007 environment supports Outlook Autodiscover and Outlook Connectivity (RPC over HTTP). You can go through the guide to verify Exchange 2007 setup. Once you have verified Exchange setup, use Microsoft Remote Connectivity Analyzer to verify Outlook Connectivity. But before migrating the mailboxes, make sure that you have assigned the right permission to mailboxes for migration.   

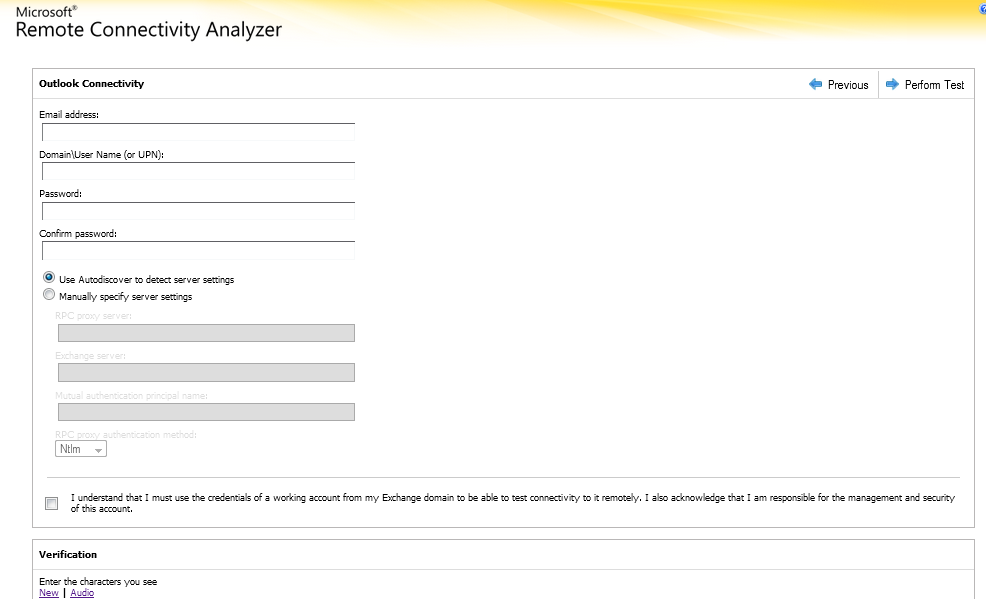
Now open Microsoft Remote Connectivity Analyzer by visiting https://testconnectivity.microsoft.com/. Select Outlook Connectivity and click Next.


Now fill all the required information and select ‘Use Autodiscover to detect server settings’ if you’re using Autodiscover to detect server settings, else select ‘Manually specify server settings’. Enter Verification Code and click Perform Test.


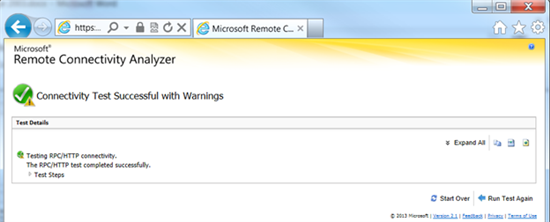
Once test is successful, you can continue to further migration steps. If test is completed with the warning, you can review and resolve the warning message if required.


But in case if test fails, use the report generated and the guide (Exchange Deployment Assistant) to fix the issues.

Setup Cutover Migration

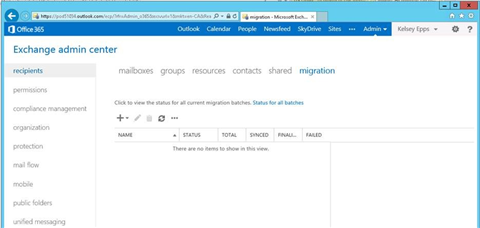
Login at https://login.microsoftonline.com/ and open Exchange Admin Center. Once you logged in, click Exchange from Admin section, and select Migration.


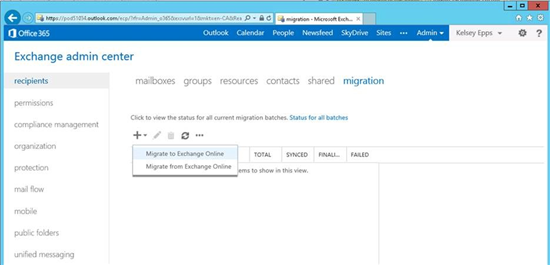
Now choose Migrate to Exchange Online by clicking on + icon.


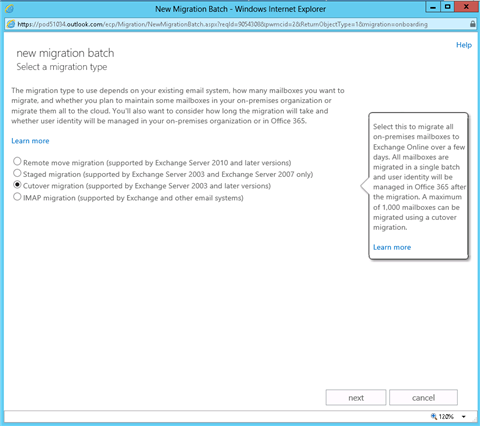
Now select Cutover migration option from the migration type and click Next.


Enter on premises account credentials and click Next.


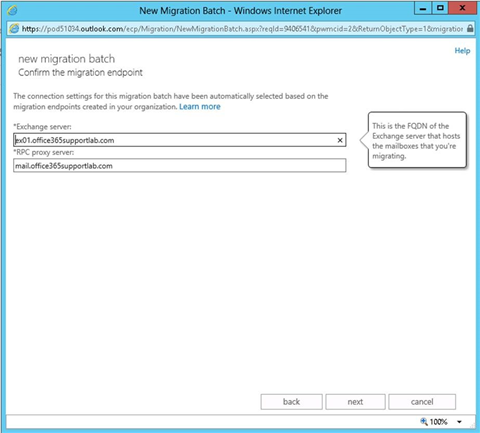
Once it will be configured correctly, Autodiscover should resolve the RPC Proxy Server and the on-premise Exchange Server. Now click Next.


Enter new migration batch name and click Next.


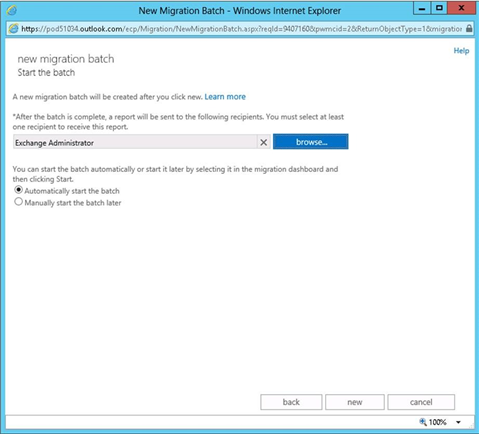
Once migration process is finished, you need to select a user account to get the complete report. However, you can also select multiple accounts to get many reports. There are two options - one is ‘Automatically start the batch’, and another is ‘Manually start the batch later’.

Select ‘Automatically’ option if you’re ready to start the migration, or manually option if you aren't ready to start the migration. Click Next.


Now the new migration batch has been created and status is set to syncing in Exchange Admin Center. 


The final migration step will take some time for completion depending on the number of accounts and the size of mailboxes which are being sync’d from Exchange Server. However, you can check the running migration process details by clicking View Details under the Mailbox Status.


Completion of the Migration

You will get an email report once all the mailboxes and accounts have synced from Exchange 2007 to Exchange Online/Office 365. Now, complete the following migration process once you have received that email-

·         Migrate public folders to Office 365.
·         Assign Office 365 licenses to all users.
·         Check that all the DNS records are updated and pointed to Office 365 services.
·         Configure your desktop to use Office 365 services.

Now you can stop the migration batch job if all the migration and MX record DNS replication is finished. Finally, stop Exchange 2007 services once all done.

That’s it. If you have any question related Exchange server migration, share your query in comment box.

Thanks,

Exchange 2010/2013 Mailbox Backup by PST-Export Powershell

$
0
0


Performing the backup of Exchange mailbox database is the most crucial part than any other process executed under Exchange server environment. As Microsoft doesn’t provided any powerful utility for Exchange mailbox backup, So Organizations lose their important data everyday due to lack of mailbox backups. However, there are few manual methods which is successfully performed by Exchange Administrators for all Exchange versions, including 2013, but these methods don’t work always particularly if there are some errors in Exchange mailboxes.


So today I’ll share with you few easiest ways to backup Exchange 2013 and 2010 mailboxes, first is PowerShell scripts method, and another is mailbox backup with a prominent utility(if you’re getting an anonymous error during mailbox export using PowerShell commands.)

Export Single Mailbox PST using PowerShell

Backup of the single mailbox can be easily exported into PST form by running PowerShell script. Exported mailbox to PST file is achieved using the MailboxExportRequest cmdlet which has only two parameters, correspondingly, -FilePath and –Mailbox, where –Mailbox describes Alias and –FilePath defines network path of PST to which you’re exporting the data.

But before exporting mailbox contents, make sure that current user is a member of role group. Simply run the below script to succeeding this- 

New-ManagementRoleAssignment -Role "Mailbox Import Export" -User "<username>"

Also ensure that location must be shared folder where PST file will be exported.

Check the below example of Exchange mailbox export request to backup complete mailbox data to an Outlook PST file.

New-MailboxExportRequest -Mailbox <user> -FilePath \\<server FQDN>\<shared folder name>\<Enter here PST File Name>.pst

You can use content filter parameters to specify the condition on a mailbox have to match to be exported into PST format. 

For example, by running the below script you can export mailbox contents into PST that match the following conditions: 

Subject ‘Re:’,
Received before 05-05-2014

New-MailboxExportRequest -Mailbox <user> -ContentFilter {(Received -lt '05/05/2014') -and (Subject -like 'Re*')} -FilePath \\<server FQDN>\<shared folder name>\<PST name>.pst

You can also define another parameter which describes the archive as the only source of the mailbox export. For example:

New-MailboxExportRequest -Mailbox <username> -IsArchive -FilePath \\<server FQDN>\<Enter the share folder name>\<PST file name>.pst

An Individual/Single MailboxExportRequest script contain multiple parameters including those I mentioned above. You can check the complete list of parameters with their syntax information at TechNet: MailboxExportRequest page.

Export Bulk Mailbox to PST file using PowerShell 

Before run the below scripts, ensure that location must be shared folder where PST file will export, and the user must be a member of a role group which has Mailbox Import Export role added. 

There are two methods for taking the backup of mailboxes in bulk-

Method 1: You can also take the backup of all mailboxes by bulk exporting foreach PowerShell command. For example, run the below command for bulk mailbox export to PST.

foreach ($AllMailboxes in (Get-Mailbox)) { New-MailboxExportRequest -Mailbox $AllMailboxes -FilePath "\\<server FQDN>\<shared folder name>\$($AllMailboxes.Alias).pst" }

Method 2: First save all the mailboxes to a variable. For example, Listofmailboxes is a variable in our case.

$Listofmailboxes = Get-Mailbox

Now export all the mailboxes into PST file with their names based on mailbox aliases.

$Listofmailboxes|%{$_|New-MailboxExportRequest -FilePath \\<server FQDN>\<shared folder name>\$($_.Alias).pst}

However, there is also alternate way to backup Exchange user’s mailboxes without using PowerShell commands. Download Stellar Mailbox Extractor for Exchange Server utility, and take the backup of single as well as multiple mailboxes into PST form. And the best part is that you can export mailbox items that match the selective condition as we have done above in Single mailbox export using PowerShell.

Right approach to perform Exchange Server (on premises) to Office 365 migration

$
0
0
The process of mailboxes migration from MS Exchange to Office 365 seems to be a very simple and easy task when you know about the complete migration process. Still you may face certain problems or technical glitches while performing the migration process between Exchange servers. 
To execute the Office 365 migration you need to do certain pre-planning, requirements that have to be configured features that have to be worked out, and then lastly selecting the mailboxes to migrate into Office 365. There is one point to notice that there is no standard or general process of migration to Office 365.

Every organization may experience something that can create a problem during the migration process.  These issues are being briefly mentioned below.
  1.  Corruption in Exchange environment: The whole of the Exchange Server environment issues need to  be worked out early.
  2. No downtime allowed: Sometime, you may come across organizations where employees (Executives or Managerial level) cannot be down on an email.
  3. Sluggish network connection: The weak network connection might slow down the upload of Exchange mailboxes to Office 365. The best approach to address this issue is ‘staging’. In this process mailboxes are gradually sweeps up to Office 365 over a period of time.
  4.   Strong security: Many organizations where network security is so clinched down that many of the default or inbuilt tools from Microsoft to migrate into Office 365 have to be adjusted to fit within the security guidelines of the organization.
  5. Misconfigured firewalls, proxy devices and CAS servers: Misconfiguration at boundary protection can cause corruption in Exchange Web Services.
  6. Unsupportive toold Outlook versions:  In order to perform migration to office 365, there are certain rolling requirements. Currently, it is supportive to Outlook 2007 SP3 or higher versions and for Entourage Server its Mac 2008 with SP3 or higher.
  7. Legal or compliance policies: The process of migrating user’s mailboxes into cloud based environment is new for organizations. And there are always many queries or questions about addressing security and compliance policies.

Now, there are many more practical issues with their solutions that I had noticed during migration:

      a)    Slow process of Mailbox Migration: Suppose you were performing the mailboxes migration that is running really slow (about 4-5 mailboxes a night) rather then 50-300 migrations generally, you may think that poor network or internet connection is the root cause behind such a bad performance.

But the reasons are completely different. Odd configurations of firewalls, security settings and migration server problems are the main causes. So a proper preplanning and testing is very necessary to avoid these issues.

      b)    Worked fine in the lab: When an organization setup a test lab and test an Office 365 account and perform everything in test and it works fine, so a lot of practical situations have been uncovered from these situations like: the lab internet connection has less traffic than the production internet connections; or test mailboxes have no corruption while real mailbox might be infected from corruption; or lab servers don’t have security layers while real professional servers are incorporated with various security policies. Moreover lab testing doesn't rectify the results which can generally be experienced on the production level.

       c)      Email Archives: Many organizations have incorporated email archiving vendors but no one has method of getting emails out of their archives. Since a long time, you’ve been stuffing emails into archives, creating stubs in Exchange and archiving attachments, moving archives to cloud based environment. 

But if you want to avoid this lengthy procedure, you just need to move all your emails (and archives) to Office 365 which provides you with a virtually unlimited archive storage plus extensive eDiscovery.

     d)    Bad Advice: When an organization installs Exchange 2013 server (as advised from consultant) as a hybrid server when they already had a perfectly working redundant load balanced Exchange 2010 SP3 CAS array. Further, this installation takes place at a different site from where the servers are normally active.

Lastly, I would like to suggest that the process of Exchange Server (on -premises) migration to Office 365 should be performed by keeping in mind all the pros and cons associated with it or under the supervision of an expert.

How to work/deal with disconnected mailboxes in Exchange Server 2013

$
0
0
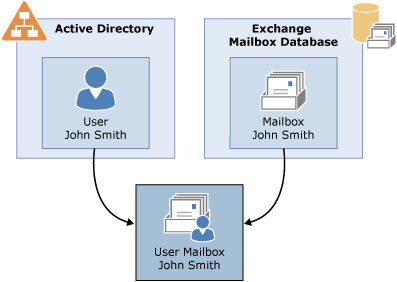
An Exchange mailbox is a composition of a Directory user account and mailbox data stored in the Exchange mailbox database. The Exchange attributes of Active Directory user object stores all configuration data for a mailbox. The database of mailbox contains the mail data that’s in the mailbox associated with the user account.


Following picture is a representation of mailbox components:


What is a disconnected mailbox?
A disconnected mailbox is a mailbox object in the mailbox database which is not associated with an Active Directory user account. These mailboxes are basically of two types:
         a)      Disabled mailboxes
         b)      Soft-deleted mailboxes

      a)     Disabled mailboxes: When a user mailbox is disabled or deleted in the EAC (Exchange Administration Center) or by executing Disable-Mailbox or Remove-Mailbox command in the Exchange Management shell, Exchange restore the deleted mailbox in the mailbox database and put the mailbox to a disabled state. These mailboxes referred as disabled mailboxes.

The difference between disable and deleted mailbox is that, in disable mailbox, the Exchange attributes are removed from the corresponding Active Directory user account while in deleted mailbox both the Exchange attribute and the Active Directory user account are deleted.

NOTE: If the user mailbox is deleted using a Remove-Mailbox command and either the Permanent or StoreMailboxidentity parameter, it will be deleted from the mailbox database immediately.

If you want to find any disabled mailbox in your organization, execute the following command in the shell:

Get-MailboxDatabase | Get-MailboxStatistics | Where {$_.DisconnectReason -eq "Disabled" } | ft DisplayName,Database,DisconnectDate

     b)   Soft-deleted mailboxes: When a user mailbox is moved to a different mailbox database, Exchange doesn’t fully delete the mailbox from source mailbox database. It keeps the mailbox in the source mailbox database to a soft-deleted state. These soft-deleted mailboxes can be retained in the source database either until the deleted mailbox retention period expires or the Remove-StoreMailbox command is executed.

If you wish to identify the soft-deleted mailboxes in your organization, execute:

Get-MailboxDatabase | Get-MailboxStatistics | Where {$_.DisconnectReason -eq "SoftDeleted" } | ft DisplayName,Database,DisconnectDate  

Now, the following is a list of activities which you can perform with disabled and soft-deleted mailboxes:

      1)    Working with disabled mailboxes: You canperform many operations on disabled mailboxes before it get permanently deleted from the mailbox database:
·         You can reconnect it to the same user account.
·         You can connect it to a different user account which doesn’t have a mailbox.
·         You can also restore it to a user account that has an existing mailbox.
·         Permanent deletion of mailbox can be done from Exchange mailbox database.

    2)  Working with disabled archive mailboxes: When Archive mailboxes are disabled they become disconnected. You can connect a disconnected archive mailbox by using Connect-Mailbox command with the Archive parameter. You can perform two operations on a disconnected archive mailbox as follows:

·         You can connect it to an existing primary mailbox.
·        You can also permanently delete it from the Exchange mailbox database.

      3)   Working with soft-deleted mailboxes: When a user mailbox ismoved from one Exchange mailbox database to another mailbox database, then a ‘soft-deleted’ mailbox is created. However, this mailbox doesn’t get fully deleted from the source database. And in case the mailbox fails to move to a destination mailbox. You can restore it back from the source database depending upon the mailbox retention period.

Following operations can be executed in the soft-deleted mailbox:

·         Restore it to an existing mailbox.
·        These types of mailboxes can be permanently deleted from the Exchange mailbox database.

So, I believe this blog gives you the better insight about the relation between the various components of Exchange Server and what sort of activities you can perform with those components (mailboxes).
Viewing all 133 articles
Browse latest View live